Every child needs their own space where they can play, dream or just have fun with their friends. You can build a playhouse from improvised materials, fulfilling the cherished desire of your child.
First of all, consult with your child and listen to his wishes: someone will like the complex house with a bunk bed, someone will want to play in a hut, and someone can build a tree house or in the yard - there are a lot of options, but they need to be commensurate with their own capabilities.
The easiest and cheapest option to make a playhouse for children. The main thing is to pick up a dense and large cardboard box, for example, from under the refrigerator or washing machine. In it, with the help of a clerical knife, windows and doors are cut through, a roof is made from glued pieces of thick cardboard. It is better to draw the design of the future home on paper: if the child is already old enough, you can ask him to help decorate his own house.
The joints in the box must be properly glued with adhesive tape so that the structure does not fall apart during use. The junction of doors and windows with walls must also be secured with tape or woven tape, otherwise the cardboard will tear very quickly. As for the decor, you can use paints and pencils, creating fantasy drawings with the whole family, paste over the walls with old wallpaper, colored stickers, colored paper applications, and so on. Inside the house, you can even hang mini-curtains and lay a rug to keep the baby warm.
.jpg)
You can make more complex architectural forms: use only the frame, and use separate pieces of cardboard to make a porch, a roof, and even some furniture.
A whole palace can be made from several large boxes, and if the joints are properly strengthened, the structure will be collapsible. Large boxes are cut along the side joints, and then the corners are glued with a wide masking tape. Furniture in the house can be made "built-in" (glue a table to the walls, and make chairs from small folding boxes).
.jpg)
.jpg)
For the game, you can sew a small tent or hut out of fabric. We will need a frame and an old sheet or bedspread. The hut can be collapsible or stationary, so it is suitable for a children's room of any size. The basis will be long wooden beams or PVC pipes (5 pieces), 1.7-1.8 meters long, they can be purchased at any hardware store. The bars are sanded and painted so that the child does not accidentally get scratched and does not drive a splinter. We make a base in the form of a pentahedron from boards or strong wire, attach a beam to each corner, and then assemble it into a bundle from above and tightly tie it with a rope or wire.
We cut out the sheet in the form of a semicircle with a small hole; it can be fixed on the frame with ties. It is worth putting a soft rug or mattress on the floor, and place a table lamp or lampshade inside.
.jpg)
We offer you a step-by-step master class of another hut that you can do with your own hands without much effort. To do this, you will need 3 round bars, 4 wooden planks for the frame, a pencil, a drill, a tape measure, a fabric for decoration, threads, scissors.
.jpg)
First, it would be nice to make at least an approximate drawing of a wooden house: it's one thing if it's a shelter for one child, another if it's for a group of friends.
.jpg)
From the upper and lower edges of each of the 4 planks (their length is approximately 160-170 cm), we mark 15 or 20 cm each. At the mark, we drill holes for round bars. Planks need to be placed in pairs in a row to check that the holes match.
After that, you can sew the canvas (its length should exceed the height of the house by 10-15 cm). At the bottom edges of the canvas, we leave holes into which round bars will be inserted. It is possible to provide for special fasteners (loops, elastic bands, Velcro), but this is more troublesome. By the way, it is better to choose a fabric that is light, translucent, then it will let in more light.
.jpg)
You can start assembling a children's house. We insert the lower edges of the round bars into the canvas, carefully fasten the top with wire, a large self-tapping screw or rope. We put a mattress, pillows, a rug inside the house so that it is cozy and comfortable in it at any time of the year.
.jpg)
.jpg)
By the way, a gymnastic hoop may well become the basis of a small tent, but such a hut is mainly attached to the ceiling with a metal hook. You can equip a hut simply on a wire frame. To do this, we make a rectangle, and then we fit it with a cloth. You can decorate the "windows" with curtains, decorate the frame with colored applications, make a folding door, shelves for toys. Of course, this design will take up enough space, but your child will really like it.
.jpg)
.jpg)
.jpg)
Here are some more interesting variations of children's houses. The easiest is to make a small dome above the bed, which can be removed at night and installed as needed. The dome can be made on flexible arcs from an unnecessary tourist tent or an old developmental rug.
.jpg)
In the garden, you can make a basis for weaving plants from a grid, as a result, a pretty decent hut for a summer residence is formed.
.jpg)
Some craftsmen manage to make a house even from plastic bottles by gluing them together. Of course, a friendly company will not fit in such a house, but for one child it is quite a suitable solution!
.jpg)
You can build a whole complex for children by placing it in the corner of the room. To do this, we make a frame from wooden slats.
.jpg)
The walls can be made of plywood or drywall sheets screwed to the frame with screws. Steps are best made of wood or sheets of metal, they can withstand heavy loads.
.jpg)
The floor on the "second floor" is best made of chipboard, the whole structure will be held on self-tapping screws or bolts.
.jpg)
Outside, we sew up the house with drywall. If desired, you can even conduct wiring inside or limit yourself to one stationary lamp (table).
.jpg)
From three bars we make the basis for the railing, on which we fill the boards so that the house becomes not only beautiful, but also safe.
.jpg)
Now we arm ourselves with paints and paint the children's corner. Steps and floors can be carpeted.
.jpg)
.jpg)
To build a small but cozy playhouse you will need: 6 boards 1.8x2.4 m with a section of 50x75 mm, 4 processed timber, 1.8 m long, with a section of 10x10 cm, 6 bars, 2.4 m long (section 5x10 cm ), 1 beam, 2.4 m long, section 50x75 mm, 1 beam 2.4 m long, section 25x75 mm, 1 roll of roofing felt, 1 box of screws 75 mm, 2 boxes of screws 30 mm, roofing nails, stain, thin planks . You will also need a tool: a hydraulic level, a rammer, a shovel, a hammer, a screwdriver, a chipper, a circular saw, a clerical knife, a paint brush.
Of course, ideally it would be nice to make a minimal foundation of rubble, but you can simply level the surface of the soil. Bars 100x100 mm need to be cut into identical parts (you choose the length yourself), the distance between the two racks should be 1.4-1.5 meters.
.jpg)
We place the support bars under the racks, fasten them together. We place pressed bars with a section of 50x100mm and a length of 2400 mm so that they pass between the uprights of the panel, which will play the role of the floor. We fasten all the bars together with screws, and fill the gaps between the lags with soil. The support bars should be above the ground so that the floor is well ventilated and does not rot.
.jpg)
Plank panels must be cut and laid horizontally, fastened together. Under them, it is desirable to put the remnants of the beam so that the floor does not rot.
.jpg)
The flooring should be uniform, it is better to leave a little margin, and then saw it off.
.jpg)
Cut the side panels, their height should be 1.5 meters, the marking is easiest to apply with a beating. Leave a margin in width to close the corners (allowances of 6 cm). Roof panels also need to be made carefully, as irregularities along the ridge will hide with a ridge.
You need to cut windows and doors in advance, having previously made markings on the canvases. In our case, the size of the door was 1.2x0.6 m. We knock down all the main details, cover with stain, and then proceed to assemble the house.
.jpg)
The outer and inner surfaces of the panels are varnished. The flooring is fixed, the walls are attached to it with 75 mm screws. We attach a 50x100 mm board to the side of the base so that it protrudes beyond the edge to which the wall will adjoin.
.jpg)
The wall is set in the desired position, the evenness is checked with a level, then the second panel is attached.
.jpg)
Install the roof, the gaps between the roof panels are closed with a wide ridge, cover it with roofing material.
.jpg)
If desired, a porch and window shutters can be built near the house.
.jpg)
Such a playhouse for children will stand for more than one year, bringing children a lot of joy and pleasure!
All children's houses for summer cottages can be roughly divided into two groups: indoor and outdoor with a slide and other outbuildings. Do-it-yourself building of children's houses is quite affordable and entertaining.
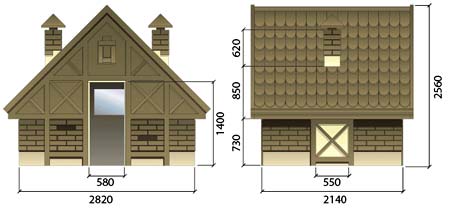
Project of a house for children with a veranda
Among the roomed children's houses, the following options are distinguished:
The easiest option for arranging a home for your baby with your own hands is to make a house from an ordinary cardboard box. To make it, you need a large box (for example, from under the refrigerator, a large TV, etc.), a construction knife, markers, a stapler and adhesive tape.
The design of a home for children out of the box can be very diverse: from the simplest (four walls, a roof and a window with a door) to a complex design (with a porch, several rooms, built-in furniture, etc.).
How to make a playhouse for children from a cardboard box?

The frame of the house out of the box is ready. Now you can start decorating it. At this stage, you can easily involve your child, the future inhabitant of a cardboard dwelling, in decorating the structure. You yourself can decorate the windows of the house with chintz curtains, and lay a rug on the floor, which, by the way, you can also make with your own hands. Don't forget to top your finished creation with balloons and garlands.
To build a house out of a cardboard box, you need to pay attention to the following points:

This children's playhouse is a fabulous fabric-covered tent. To build it, you need 5 wooden or plastic sticks (an average of 1.5-1.7 m), hard wire, planks (5 pieces per meter), fabric (this can be an old bedspread, sheet, or just a piece of fabric). 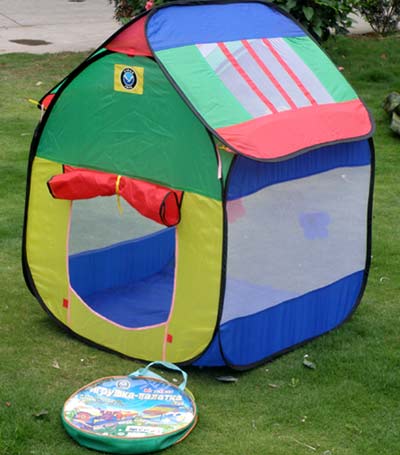
Building a house - a tent with your own hands is quite simple:

The tent is ready, now you can start decorating it. Balloons, homemade garlands, a non-toy rug on the floor of the tent, etc. can be used as decor.
Plastic children's playhouse can be both indoors and outdoors. Plastic houses for children can be manufactured industrially, or they can be made by hand.
The advantages of such houses include:
Plastic houses have many advantages, but there are also disadvantages:
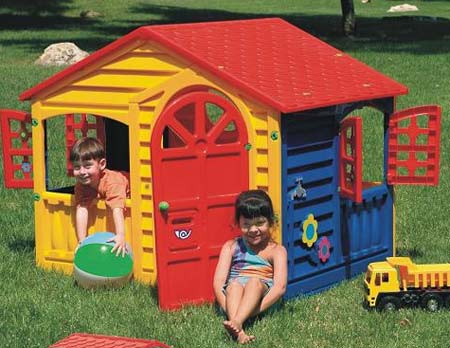
To avoid the disadvantages of ready-made plastic houses, it is recommended to make a plastic house with your own hands.
The construction of children's houses made of plastic with their own hands has a number of features.

There are a lot of options for children's houses designed for installation on the street:
And this is not all ideas for outdoor children's facilities.

Among them, only inflatable houses are not made by hand, and all the rest can be done by yourself.
It is quite difficult to build children's houses from wood and plywood with your own hands. The whole process starts with planning. A drawing is created, where the dimensions of all the main structural elements are marked. Everything should be taken into account: the open structure of the house will be or closed; height, number of rooms and their sizes; the presence of doors and windows; the presence of additional add-ons (slides, sandboxes, stairs, a dry pool with balls, etc.).
When planning a house, pay attention to the following features:
A do-it-yourself house made of plywood and boards is built according to the following algorithm:

The house is ready. Next, proceed to its external and internal decoration. The outer and inner surfaces of wooden houses for children are primarily treated with an antiseptic, an anti-bug substance and stain. And further decorating the house is purely individual.
Such houses are often equipped with a slide and. It would be nice to organize a solemn "delivery of the keys" to the owner of the apartment with balloons, holiday posters, music and treats. Then this holiday will be remembered by the child for a long time.
For children who, by age, no longer play fabulous buildings on the ground, you can equip a tree house with your own hands. Here it is important to remember some features:

Inflatable houses - a tent is an option for inexpensive purchases of ready-made dwellings for children. Inflatable houses, as a rule, are equipped with a slide, a dry pool with colorful balls, a roof, and several rooms. Inflatable houses are small in size, and therefore suitable only for children under 4 years old.
Inflatable houses have a good overview, and therefore the baby can play in it under the constant supervision of the elders. Inflatable structures are easy to assemble and install, and therefore, as needed, it can be compactly stored in the room.

Inflatable houses can be inflated to varying degrees of inflation. Children love the effect of the swaying sea, when inflatable structures are inflated only 2/3 of their capacity. Inflatable houses look very organic with balloons. Balloons can decorate the toy house itself or the area around it.
There are craftsmen who build houses for children from plastic bottles. The bottle house turns out to be small in size, which means it is suitable only for kids.
Plastic bottles make a lightweight structure, so the structure needs to be strengthened.
Building a house out of bottles is easy - all you need is scotch tape. Both the walls and the roof of the dwelling are built from bottles.

You can also make interior decoration of rooms from bottles: a table and a chair from bottles, shelves from bottles and even a bottle mat. And you can complete the decor with balloons.
Apartments for dolls are often expensive, made of plastic - a fragile, quickly breaking material. The article describes how to make a toy house with your own hands.
To fulfill a child's dream of a house for his favorite doll, it is not at all necessary to go to the store. You can make a plywood cottage according to your own project.
Why you should build a homemade plywood dollhouse:
Dollhouse is made from different materials. The best option is plywood:

Formaldehyde is used in the production of plywood. They are part of the impregnating adhesive for joining fibers. To avoid poisoning, the ingress of hazardous material into the nursery, it is necessary to pay attention to the labeling of the sheets:
Furniture and its components must be made from the safest plywood class - E0.
Making a house for plywood dolls is a multi-stage process. It is required to follow a certain sequence of actions. To facilitate the work, you can use the step-by-step instructions.
The scheme should display the layout, the dimensions of the floors in length, width, height.
You can find a sketch on the Internet, adjust it. The photo shows several basic schemes of a toy dwelling.


The most important thing is to keep the proportions of the sizes in scale. This is necessary in case you want to change the dimensions of the product during operation.
The design can be thought out in advance in order to purchase and prepare the necessary materials for decoration.
For assembly you will need:

For registration you will need:
To assemble the wooden parts into a single whole, they must be cut from a blank sheet. To do this, scale sketches are transferred to paper, finished parts are cut out of it, and later used as a template.
If windows are not indicated on the diagrams, they are drawn when transferring patterns. On a flat-looking house without a front wall, cuts for windows are not needed.
Step by step assembly instructions:
Cutting and edging must be done by an adult.

The finished frame of the house is left for several days until the glue dries, and the structure acquires sufficient strength.

After assembly, proceed to design.
The finished frame is decorated and furnished with doll accessories. Recommendations:
Not only the aesthetic, but also the practical side of the house is important: toys must be stored somewhere, accessories must be removed, something must be hidden. You can make additional built-in drawers in the upper or lower tier. This is appropriate if the house is large, occupies a significant place in the living space.

The boxes are also made from plywood.. The drawing provides a place for storing things. The sides of the box are cut out of plywood, glued together. Screw the handle, insert into the department.
You can make a folding door as in the photo. To do this, the cut canvas is screwed onto metal loops.

A handmade plywood toy house will be a good gift for any child.
The construction process will take 2-3 days, taking into account the preparation of blanks, their cutting, drying glue. The child can arrange the premises independently.
It is also worth thinking about placing a house in which the baby can enjoy the game and constantly fantasize. It can be made from a variety of materials that remained after repair or construction. If you live in an apartment, then you can always find a corner in it that will fit a small structure. It is not difficult to build a children's house with your own hands. This will be discussed in the article.
Undoubtedly, the choice of materials for the manufacture of the house is quite large. Almost everything is suitable for making a simple design. The most common types of playhouses are:
Since we are talking about a house in miniature, then it should be designed in accordance with all the rules. At a minimum, pillows, boxes with toys and a table should be placed here. If the place allows, and the imagination of the parents has no limits, then the resulting children's housing is decorated and decorated not only inside, but also outside. This will only add interest and intrigue the baby. Wanting to make a site with a house in the country, it is worth considering the impact of atmospheric phenomena.
If the child is old enough (from a year old), then it is worth involving him in the process. Thus, the baby will be able to learn simple skills and develop fine motor skills through the game.

Before drawing up a drawing of a future building, it is necessary to think over several main points, namely the type and type of house, as well as its dimensions. To do everything correctly, you should define the following parameters:
Also, when developing a building plan, a few more points should be taken into account:

The drawn up scheme will allow you to assemble the structure exactly according to the specified parameters, which means that the result will be excellent. If there is no time to develop a sketch, then you can use the ready-made drawings that are given in the article.
Windows and doors that are provided in the children's house should face the house so that parents can constantly monitor the child.

Since a wooden house is one of the most common for outdoor placement, we will consider it in more detail. The list of its advantages should include: practicality, strength, durability and safety, which is important. To make a children's house out of wood, you need to follow the following stages of work.

First of all, you need to decide on the place where the house will be built. This point is especially important when it comes to stationary construction. Undoubtedly, every child's biggest dream is to have their own playhouse in a treehouse, but this, in turn, increases the possibility of injury, so we will focus on a hut built on the ground. If desired, it can be supplemented with other children's elements for the game.
When choosing a place, focus on the area where there will be a shadow after lunch. In such a house it will not be hot, and the child will be able to play throughout the day. Also, do not forget that there should be no obstacles nearby, since a kid who is keen on playing will not notice flower beds, garden beds or building materials. It will also provide a high level of security.
Separate the children's play area with a low curb, for example, from car tires.

All dimensions are chosen arbitrarily depending on the wishes and available material. If we are talking about a small playhouse, then the following sizes will be enough:
The first step is to prepare the foundation. Despite the fact that we are talking about a simple design, so that it lasts at least 5 years, it is worth considering the presence of an elementary foundation layer. So, as a base, it will be enough to fill the site with a small layer of rubble or compact the soil well with sand.
When decorating the floor of the house, you can choose one of the common options:

Do not forget about such an important point as waterproofing, which can be a simple roofing material. Special mastics are also suitable, if any remain after construction. This stage will extend the life of the playhouse.
The basis of the floor will be simple wooden boards 3 cm thick. They are connected into a rectangular box and fixed with metal corners, which will add strength. For greater reliability, experts recommend installing additional transverse bars. MDF or chipboard sheets will serve as a finishing material, you can even use wooden panels. After the floor is ready, it is necessary to treat it with protective agents (antiseptics) and paint it with paint.
The presence of a small gap will allow air to circulate well and ventilate the house after rain or winter.

For the construction of the walls of the playhouse, it will be quite enough to use the bars from which the frame is mounted. After that, it is sewn up with clapboard or all the same shields. During installation, do not forget about windows and doors:
When installing the roof frame, first fix the front and rear element, and then place the middle parts.

Now you can proceed to the direct sheathing of the frame of the playhouse. Common materials in this case are:
In the case of lining, the process is much simplified, since there is no need to adjust all the elements to the specified dimensions. They also connect easily with each other. In this case, the roof is covered with edged boards and protected with roofing material. If there are tiles or ondulin left, then they will do. Everything will depend on your imagination and possibilities.
Before you is a real and full-fledged playhouse. The final touch is the design and decoration. How to do it? This will also depend entirely on the materials available and desire. It is enough to be guided by simple tips and recommendations:
Always remember safety. Everything that is inside the playhouse and the building itself should not have sharp elements.

A simpler design is the construction of simple plywood sheets. But, despite its simplicity, such a house will delight every child and allow him to expand his imagination for games every day. Such a construction has many advantages, but the main one is the expenditure of a minimum of time and effort.

As in the previous case, the plywood house should first be sketched on a piece of paper in order to know the result exactly. Consider the scale and calculate the required amount of materials. The construction site is being cleared and levelled.
You should also collect all the tools that will be needed during construction:
The list of materials must include:
You should also take care of personal protective equipment in advance: gloves, work clothes, goggles and a respirator.

Using a hacksaw, the timber is cut into pieces for mounting the frame. All elements are cleaned with sandpaper and treated with antiseptics from the fungus.
When developing a drawing, it is worth considering the age and height of the child. The first indicator will set the theme of the gaming house, and the second - the dimensions.

Do not forget that the final in the arrangement will be the installation of windows and fixing doors. Windows are cut out of plexiglass in accordance with the window opening. They are fixed with glazing beads and small nails. For greater strength and reliability, the edges should be treated with a sealant. Beautiful platbands will complement the picture, which will give more comfort.
A massive door in the playhouse is not needed. In most models, it is completely absent, but for a greater sense of usefulness, it is worth providing them. Only 1 layer of plywood is suitable for it, which is reinforced with transverse dies. Fix on door hinges and paint.
The house on supports provides for the presence of a ladder or a small threshold. Its width should correspond to the doorway. The steps should be wide so as not to fall during active play.

Any children's building will not be able to cause difficulty for a person who knows how to handle a hammer. It is enough to choose the right scheme or draw it up yourself, and then follow the specified parameters and data exactly. Do not limit your imagination, and also connect your baby, who himself will tell you what and how he will be more comfortable in his own playhouse.
This video shows an example of how to make a wooden house for a child:
The photo instructions we have proposed show step by step how to make a playhouse:


Ideas for different types of houses for children:


These diagrams show how to make calculations for a children's house, which will allow you to quickly think through your project:


A happy childhood is the key to a healthy adult life for every person. That is why parents try to create the necessary conditions for the formation of a full and successful personality. Children are often attached to their moms and dads and love to give them most of their time. However, each child needs his own little space, where only he will be the owner. To this end, you can build a wooden children's house in the country for the summer pastime of your beloved child; his toys will settle in him, there will be room for his fantasies and dreams in him. And if you are truly caring parents, do not miss this opportunity: build a house with your own hands, taking into account the wishes of your child. Better yet, involve him in the construction himself, entrusting him with the role of an architect, engineer or designer.
There is nothing difficult in the construction of a children's house, even for a man who does not have a special construction education. After all, this design should be simple. The main thing is to decorate it externally and from the inside, so that it turns out bright and colorful, like in a children's fairy tale. So where to start? Of course, from the project.
When developing a project, consider the following points:
In addition, consider such nuances as:
Design the drawing yourself; if in doubt, then consult with one of the familiar experts to get the right design.
To build a small house you will need:
You can’t do without the necessary tools: a shovel, rammer, hammer, screwdriver, level, circular saw, clerical knife, paint brushes.
Be sure to make cuts from the inside of the panels to avoid chips on the outside. Read about the drawings of the gazebo with dimensions.
Choose a place for the house. It is important that there is a lot of free space around the house. After all, kids love to frolic in the fresh air.
Tamp down the top layer of soil and make a frame out of decking boards. Then form the floor from the plank panels.

Preparing the foundation for the future home
Also make wooden shields for walls from beams and panels. Now it is important to cut openings in them for windows and doors. The house must have at least two windows so that the room is adequately lit. Start with the windows, and cut the doors halfway so that the loose panel does not lose its rigidity. Finish sawing the doorway only after attaching the front panel.
Cover all the components with stain and varnish (inside and out), then connect them. Fix the flooring first, then attach the walls. But how to do it, you can find out by reading this article.
Make windows and doors according to the dimensions of the openings. Do not forget to design frames and, which in this case perform not only a protective, but also a decorative function.
The roof should be gable so that rainwater flows off it. It is better to make the base of the roof from wooden panels, but you can cover the roof with roofing material or other light material. It can be tiles, plywood sheets or lining, and even linoleum.
However, roofing material is the most successful and low-budget option. Do not be afraid if the folds on the material are not completely smoothed out: in the sun this will definitely happen, and the roof will become even and smooth.
So, the most interesting and creative stage has come. Here you can dream up plenty and decorate the house brightly, uniquely. Involve your child for this, let “traces of his work” be visible on the house, for example, some drawing made by your own hand. Do not forget before you take up brushes and paints, carefully process the edges and corners, smooth out all the bumps on the surfaces of the structure; so you protect your child from injury.
As for the decor, here, too, you can give free rein to the imagination. Hang interesting curtains on the windows, decorate the house with flowers, toys, drawings, etc. Be sure to build furniture: benches, chairs, a table, etc.
In front of the house, you can build a porch with railings and racks, which will not only decorate it, but also serve as a support for the protruding part of the roof.
Watch the video below for all stages of construction.
If you have a large, strong tree growing on your site, then a house built on it will be a great idea. Believe me, your child will be delighted with this. How to implement it? Read how to build a children's playground.
To get started, choose a suitable tree: the safety of small tenants depends on this. Consider the following requirements:
The choice of material must be taken very carefully: it should be as light as possible so as not to create an excessive load on the tree. It is best to use wood siding in combination with plastic elements. Boards before starting work must be dried and treated with an antiseptic, which will provide protection from decay and pests.
Before starting the construction of the house, choose the method of its installation: on the ground or on a tree. The last option is the most time-consuming, since the main part of the platform is made on the ground, and then attached to a tree. You will also need to build a ladder so that children can freely, and most importantly safely, climb and descend it.
For fastening, use not nails, but self-tapping screws, screws or bolts, which will hold the structure on the tree more securely.
If you want to do something original, then consider the following selection of options:

Bunk houseHouse "airship"

Bright house with furniture
As you can see, the children's house can be the way your children see it or your imagination. The main thing is that the building turned out to be safe, become a cozy refuge for your child and settle happiness and love in his soul. Read how to make a homemade sandbox for children in the country.


