How to fix the MDF panels to the wall, and on what basis - the decision must be made taking into account the features of the wall geometry, the size of the room, the presence of communications and constant heating. Despite the huge popularity, MDF wallboards are quite picky about operating conditions, so you should not fix it in the first way that comes to hand, so as not to re-lay the finish a second time.
Often, consultants of trading companies present MDF boards as a lightweight version of particle boards, especially if you decipher the English abbreviation. Accordingly, it is recommended to fix them in the same way as in the case of using chipboard. In fact, MDF panels are significantly different in structure and production method from particle board, which allows you to fix the material at a lower cost and faster.

There are only three main differences:
The difference, at first glance, is insignificant, but it is the strength and elasticity of the cellulose fiber base of the MDF panel that makes it possible to fasten the cladding plates using end locks.

Even with a strong temperature difference, the MDF panel shows an expansion level much less than that of plastic or ordinary wooden lining, so the material can be fastened with smaller gaps, which is especially important for medium and large thickness boards.
For wall cladding, three size groups are used:
There are no restrictions on external dimensions, and the maximum thickness of the plates is limited by the pressing capabilities to 40 mm. Two-layer MDF panels with a maximum thickness of up to 60 mm are also produced, used for the manufacture of reusable formwork and roofing filing. But the quality of the outer surface of such plates is quite low, so they are not used for wall decoration.
Pressed cellulose fibers retain heat and absorb noise much better than plastic or wood. In addition, the MDF panel has a certain anisotropy of properties, it can be cut and processed in almost any order. Mounting the panels is easy and quite within the power of even a novice tiler.
For domestic purposes, panels can be mounted in three ways:
The latter case is used as an exceptional way of cladding walls in a house made of timber or logs. It is necessary to fix the MDF boards on the ceiling suspension profile with a small gap between the floor and the bottom edge of the board. The cladding is suspended on the profile, and as the walls shrink, the MDF sags along with the timber material.
It is clear that for a wooden house it will be more preferable to use narrow slabs, 190-200 mm wide, while it is better to fix MDF in a vertical direction. If it is not known exactly about the planned amount of shrinkage of the wall, then it is best to fix the decorative finish with a gap increased by 2-3 cm. Firstly, this ensures that the floor will not tear the slabs off the walls in case of excessive shrinkage, and secondly, the slots will provide a normal level of ventilation and airflow between the panels and the wall.

Installation of panels on a supporting frame made of galvanized profiles is recognized by experts as the most rational and reliable way to fasten any pulp and fiber materials. Even heavy plates with a density of up to 1.5-1.8 g / cm 3 can be attached to the metal frame without any problems. The metal will not lead to condensation or blocking of the walls as a result of pipe breaks, water leaks in the apartment on the floor above or roof breaks.

The assembly of the frame begins with the installation of the starting profile and side rails. MDF panels are lightweight, so it is enough to install a number of vertical profiles No. 50 in increments of 40-50 cm. Using a galvanized U-profile makes it possible to fix MDF to the walls of a room about two to three times faster than in any other way.
Two or three drops of silicone applied to the profile will even out the load on the wall and avoid the slamming of the cladding in strong winds if there is a ventilation gap behind the decorative MDF lamellas.
The easiest way is to mount MDF panels on a wooden frame. There are two options for wall cladding using cellulose fiber panels. It all depends on the size of the room and the condition of the walls.

If a small reduction in space due to the crate is not critical, the wooden slat frame is sewn onto the walls using metal hanger holders. For small and small rooms, most often it is necessary to partially cut and knock down a layer of plaster in order to level the surface along a vertical plumb line, to make it as even as possible.

In any case, the starting bar is initially laid on the floor and under the ceiling. With the help of a long building level, the installation points of the suspensions are marked on the wall and the minimum required overhang of the side lobes of the fasteners is determined.

In the event that it is planned to install horizontal MDF lamellas, the bearing strips are mounted vertically. For the installation of full-size panels with a width of more than 200 mm, the walls are sewn up in both directions. Each wooden plank of the crate is aligned with the starting guides and fixed with suspension petals using self-tapping screws and a screwdriver.

For relatively even and dry brick, concrete or block walls, the batten can be fixed directly to the wall using dowels. In this case, the work is added, since each plank before fastening has to be adjusted for a long time with the help of washers in order to maintain a single vertical plane. But on the other hand, you can save 3-4 cm of internal space, which can be very useful, for example, when decorating the walls of a small bathroom or corridor.
Using a sheathing or supporting frame always eats up an additional 3-7 cm of space on each wall. The use of a frame system is considered a good solution, but it is not at all necessary to fence the frame jungle if the walls of the room for future MDF paneling turn out to be even, without serious defects and deviations from the vertical.

In this case, it is enough to clean the walls, prime them with an acrylic primer and apply a thin layer of insulating putty. The lime underlayer will help to further level the walls and improve the applicability of the MDF boards to the supporting surface.
Laying panels on the walls with glue is carried out in two versions:
If the lamellas are glued directly to the wall, then the end joints are not glued or treated with sealing materials. Most often, with the help of glue, rather large panels are laid on the walls, 40-60 cm wide. This method is more advantageous from a technological point of view, since the load from the rather large weight of the MDF panel is distributed not over several clamps or brackets, but over the entire surface of the plate and walls. What does it give? Greater reliability, if the upper row of MDF lamellas breaks, the middle and lower rows will hold the entire structure.

Before fixing the MDF panels to the wall, the reverse side is covered with small portions of glue. It can be dots, spirals, short stripes. The main thing is that the adhesive material is evenly distributed over the surface of the wall.
As an adhesive, it is best to use automotive sealant, polyurethane adhesives and home-made adhesive masses based on a mixture of acetone and foam. Acrylic and polyvinyl acetate adhesives hold MDF panels rather weakly.
For your information! The MDF sticker on the sealant provides the ability to cut and remove the panel from the wall if necessary without damaging the surface. Tougher alkyd, polystyrene and acrylic adhesives can tear off some of the wrong side.
The process of installing cellulose fiber panels is relatively simple and straightforward even for a beginner. If a horizontal laying method is used, then the bottom panel or lamella is installed first, directly resting on the starting bar of the frame. It must be laid on glue, aligned with the building level and fixed with a stapler or self-tapping screw.
Before laying the next panel on the wall, it is necessary to install the corner or edge elements of the cladding, fix them on the wall, and only then proceed with laying the next parts of the MDF.
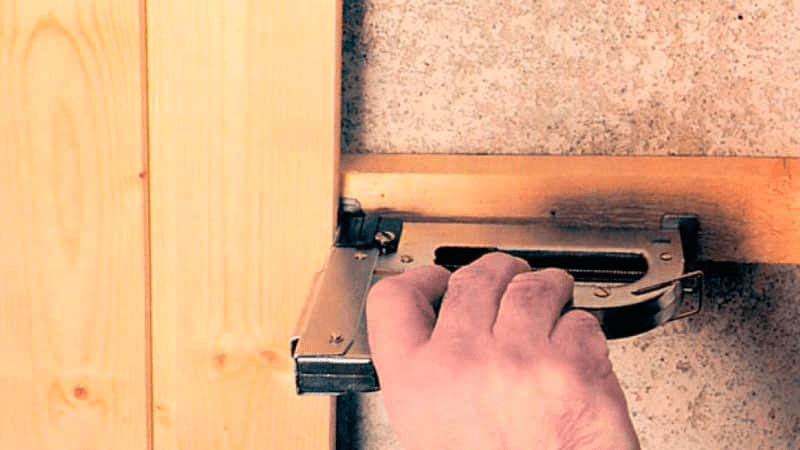
How to fasten MDF panels to a bar or profile is selected individually in each case, based on the fastening conditions and the dimensions of the material. Relatively thin, 6-9 mm lamellae are snapped into place with tongue-and-groove locks, after which the free end is sewn to the beam with staples with self-tapping screws. If it is supposed to be possible to periodically remove the MDF lining from the wall to revise the communications or wiring laid behind the decorative finish, then the panels are placed on the clamps.

Thick plates are mounted directly on the walls with glue and dowels, sealing the joints with acrylic putty and then gluing wallpaper or PVC film.
MDF boards are much simpler and easier to handle than heavy drywall, plywood or plastic, while the strength of the panels is enough to build two and even three-layer cladding options from a fiber composite with insulation as an intermediate layer.
For example, cold exterior walls made of profiles, siding or concrete blocks are hemmed from the inside with MDF boards of HDF class, with a density of 800-1800 kg / m 3. The thickness of the plates is 25-40 mm. The laid panels are sewn together at the joints with oblique self-tapping screws and staplers, the seam itself is rubbed with polymer mastic.
The material is treated with impregnation, which provides good vapor transmission with high resistance to surface condensate. Plates are attached to the outer walls "on the cold" - with the help of steel dowels and joiner's screws. From the inside of the slab sheathing, wooden or trimmed slats are sewn.

A steam membrane is pulled over the laid thermal insulation and clogged with horizontal slats with a section of 20x20 mm. At the last stage, light decorative MDF panels of the LDF class with the texture of wood, natural stone or veneered are sewn onto the lathing.
Due to the low density of LDF, 200-600 kg/m 3, MDF panels perfectly pass steam, which is removed through the ventilation gap and the ceiling ventilation joint. In this way, walls are sheathed in summer kitchens, balconies, verandas, any rooms with frame-type walls.
Most professional finishers prefer to work with MDF as there is no dust or dirt like drywall, installation is faster and there are far fewer problems.
The assembly and installation of MDF on walls is in many ways similar to laying laminate floors, with the only difference being that there are more options for choosing schemes for decorating the room and a much more complex arrangement of corner and sloped wall sectors.
The scheme for arranging door or window slopes is no different from drywall options. If the lamellas were laid vertically on the walls, then to design a window or doorway, it is enough to cut a panel of the required height and width and stick it on the slope plane with mounting foam or sealant.
If the walls in the protection room are horizontal panels, then the slopes will have to be collected from segments on self-tapping screws and plastic plugs.

Slots and gaps are always formed between the laid additional elements and the main part of the cladding. They have to be eliminated with the help of special decorative corner plates and decorative skirting boards.

All auxiliary decor is glued to Titanium or Mounting Moment for MDF, a small amount of glue is applied to the edge along the gap, after which a corner strip is installed on the joint. To prevent the decor from moving away, the corner is temporarily fixed with tape.
Every room has at least a couple of outlets and one switch. In order not to dismantle them during the installation of MDF, proceed as follows: measure the coordinates of the location of the outlet on the wall, after which a hole of the appropriate shape and size is cut out with an annular drill or a jigsaw. When installing the MDF panel, the size and position of the hole is specified and cut with a sharp knife.

It remains to install the panel, fix it on the wall, and close the remaining gap with a decorative frame.
The details of the process, how to fix the MDF panels to the wall, must be thought out and planned in advance, before the start of work on the decorative finishing of the room. The process itself is not particularly difficult, but in any room there are many problem areas where you have to almost invent the method of fastening on your own. In this case, it is better to draw the details and the fixing method on the diagram so that you don’t have to rack your brains and waste time in the process.
Wall decoration with MDF panels has recently become more and more popular, due to the fact that with the help of them you can quickly tidy up surfaces of a fairly large area. In addition, the installation of the panels will not take much time, since you do not have to wait for the drying of numerous layers, as, for example, in the case of plastering. It also plays into the hands that the surface leveled by them does not require any additional finishing, as is the case with drywall. Another advantage of this material can be called a very affordable price for it.
Do-it-yourself MDF wall mounting panels, which can be carried out even if there is absolutely no experience in this work, are installed quite simply. The main thing is to understand the principle of such cladding, prepare surfaces and pay special attention to accurate calculations and markings.
The abbreviation "MDF" stands for finely dispersed fraction, from which this finishing material is made, including wall panels. The production of MDF consists in the process of dry pressing of a finely dispersed mass from sawdust and shavings, using high temperatures and pressure. To bind the mass, carbamide resins modified with melamine are added to it, which prevents the evaporation of formaldehyde, chemically binding it (formaldehyde emission class - E1). MDF panels are considered an environmentally friendly material, so they are not prohibited from being used for interior decoration. The principle of installing panels is similar to installing natural wood, but they have a lower price than the latter.
Installation of MDF wall panels can be carried out in two ways - fixing them to a frame crate or fixing them to the wall surface using an adhesive composition such as "liquid nails". This adhesive is used not only for the installation of wood products and its products, but also for sealing cracks, as it contains sawdust filler. If the filling of defects will be carried out on the remaining visible sections of the wall, then the adhesive mass should be selected by color so that the patched sections do not stand out against the general background.

MDF panels are produced in a wide variety of shades and can have a textured micro-relief pattern that imitates various types of wood or stone, so they can be matched to any interior design. In addition, the panels are easily combined with each other and can be installed vertically or horizontally, depending on what effect the owners want to achieve.
For example, if the ceiling is too high and makes the room uncomfortable, you can install the panels horizontally, using different shades of them alternately. If you need to visually raise the wall, then the panels are installed vertically.

The panels are produced in different lengths and widths, so before choosing the color and shape of the material, you need to think about what effect you want to achieve.
To work comfortably, you need to prepare tools in advance that will speed up the installation of the finishing material, making it as simple as possible. So, from the tools you will need:
For the installation of MDF, certain auxiliary materials will be required. Moreover, the purchase of some of them will depend on the choice of mounting method.
Mounting panels on walls can be done in two ways:
Both methods can be used to install panels both in a private house and in an apartment, but for adhesive installation, the main condition must be met - the wall must be perfectly flat. Therefore, if the panels are to be glued to the surface, then it must first be leveled with drywall or plaster-putty method.
To mount the panels on glue, you will need very few auxiliary materials - this is the “liquid nails” composition and fittings.
If you need to level an uneven wall with MDF paneling, while hiding communications behind it or conducting insulation and sound insulation, you will first have to install a frame that will bring the entire future surface into one plane.
The frame for the installation of panels can be made of a wooden beam or a metal profile. It must be said that fastening MDF is easier to carry out on wooden material, since nails or even stapler staples are suitable for this. When mounting panels on a metal profile, metal screws will be needed, and in this case it will not be possible to do without.
When using a frame, a gap inevitably forms between the main wall and the cladding, in which there will be no ventilation air circulation - such conditions are very “attractive” to mold and fungus. Therefore, before installing the crate, it is imperative to audit the wall. If it is wet, then it will need to be dried first, and then treated with special antiseptic compounds. It is still better not to install such a cladding on external thin walls at all, as it will quickly become unusable, and in addition, an unfavorable microclimate will be created in the room over time, which can cause allergic reactions in residents.
To install the cladding panels on the frame, the following materials will be required:


Surface preparation can only be carried out if it is dry. If you find signs of high humidity on it, you must first determine the cause of this phenomenon, and then try to eliminate it. It is impossible to close a damp wall with any panels.
If there are no such obstacles for the installation of MDF panels, then approximately the same preparation of the wall surface is carried out both for the frame system and for gluing. It consists of several operations:
If the wall is covered with wallpaper, then they must be completely removed, otherwise in a closed space they can become a breeding ground for mold or even insects. High-quality pasted wallpapers, which are difficult to remove, must first be soaked with water or steamed with an iron, and then cleaned with a spatula. Sometimes you have to resort to using special formulations for.

If the wall is plastered and whitewashed, or qualitatively painted with water-based paint, then it is not necessary to clean it.
In the event that mold spots are present on the wall, then the surface must be “treated” - treated with a special “Anti-mold” compound or with the usual concentrated bleaching agent “Whiteness”. Before processing, it is recommended to clean the surface to the maximum possible depth with a spatula. When the applied composition is absorbed and dried, the wall must be cleaned again with a spatula, and then the treatment should be repeated. It is advisable to clean the area affected by the fungus to the ground, that is, remove the plaster in this place completely and process the main wall itself well.
 "Treatment" of the affected areas of the wall with antiseptic compounds
 This work should be carried out in compliance with the mandatory safety measures, in a respirator or in a special mask, in order to avoid inhalation of particles of plaster affected by the fungus.
If, after removing the wallpaper or “weak” plaster, cracks are found on the wall, it is recommended to repair them, especially when planning the placement of heat and sound insulating materials under the MDF panels. Cracks must be repaired so that they do not become bridges of cold, as well as a place where dampness accumulates, various insects or the same mold can find shelter.
 Cracks are first cut in breadth and depth, ...
 In order for the putty or plaster mortar to hold well in the gap of the crack, it needs to be slightly expanded and deepened. Then it is cleaned of the remnants of the old plaster and processed with a brush.
 … and then densely filled with repair mortar
 After the primer has dried, the cracks are sealed with a putty mixture or plaster mortar. In this case, it is necessary to try to ensure that the expanded gap is filled to its full depth.
The next step is to prime the entire surface of the walls. Moreover, it is necessary to choose a primer composition containing antiseptic components that will resist the emergence and development of mold, as well as other manifestations harmful to humans.
 Mandatory operation - thorough priming of the entire surface of the wall
 If it is planned to sheathe wooden walls, then it is recommended to choose a primer, which includes not only antiseptics, but also fire retardants - they will increase the fire resistance of wood.
The primer is applied to the wall with a roller in two to three layers, each of which must dry thoroughly before applying the next.
Further, in the event that the panels will be attached to the crate, you can proceed to gluing the insulation material. For this purpose, "penofol", which is glued to a primed surface, is well suited.
 The most convenient in work - "penofol" on a self-adhesive basis
 Today, you can find self-adhesive "penofol" on sale - it can be very easily fixed on the wall with foil towards the room by removing the protective film backing. If such material was not found, then the usual "penofol" is purchased. It is cut to the height of the wall and glued to the Teploflex glue, applied in an even layer on the wall surface or directly on the insulation. Cloths of "penofol" are pressed against the surface, and with the help of a rubber spatula, air is expelled from under it.
 Gluing the joints of adjacent strips of "penofol" with adhesive tape
 Sheets of material are mounted end-to-end, and then the glue must be allowed to dry, after which the joints are glued with special foil tape.
If it is decided to mount MDF panels on the frame, then first you need to decide how the elements will be installed, vertically or horizontally, since the location of the batten guides depends on this factor. For horizontal orientation of the panels, the guide battens are mounted vertically. And vice versa, if the panels are mounted vertically, the frame elements are installed perpendicular to them, horizontally.
The frame is fixed on top of the insulating material. The step between the railing guides is usually chosen within 500÷600 mm from each other, and they must be installed perfectly even.
To find the perfect vertical, you need to use a plumb line with a colored cord, with which straight lines are beaten off on the wall. If the lines are beaten off on a foil surface, then immediately after the beating, each of them is additionally highlighted with a black marker using a ruler.

To determine the horizontal, I resort to the help of a level. The most accurate result will give a laser or water. If there are no such tools, then you can use the usual construction one, expelling the bubble into the middle with special care. Having outlined the currents, they are also connected by lines using a colored cord.
According to the markup, it will be quite easy to correctly fix the guide battens.
When marking, it must be taken into account that the first frame guide is installed at the junction of two surfaces, that is, in the corner of the room or along the floor surface. The first racks will serve as a reference line for the rest of the elements, maintaining the set step.

Wooden bars, despite the marking lines, when installed on the wall, are still checked by the building level for evenness. Then, they are attached to the wall with dowels, for which holes are drilled right through the bars, into which plastic dowels are hammered, after which self-tapping screws are screwed into them (or driven dowel-nails are used). Fasteners are installed at a distance of 350÷400 mm from each other. The length of the dowels or self-tapping screws is chosen so that they go into the thickness of the wall by at least 50 ÷ 60 mm, and the thickness of the crate beam is added to this parameter, given that the screw head is completely recessed into the wood.

It is more difficult to bring all the racks of the crate to the same level if the wall requires alignment with the crate, and the bars themselves will have to be fixed to hangers. In this case, the installation of the frame is carried out in the same way for wooden bars and metal profiles.

Hangers are first fixed to the wall along the marking lines. I fix them on the wall with two dowels, maintaining a step between adjacent ones at 350 ÷ 400 mm from each other. Hanger shelves are bent perpendicular to the wall surface.
Then, two extreme beams on the wall are installed, aligned in level and relative to the wall. They are attached on both sides with self-tapping screws to the shelves of the suspensions. The protruding parts of the shelves are bent back towards the wall.

The installed extreme guides are connected along the outer edge with stretched cords from above and below (or to the right and left - with the horizontal orientation of the frame) - this will become the reference lines (beacons) for the correct installation of the remaining guides in a single plane.
Metal profiles prepared in size are fixed on the wall according to the same principle as wooden bars, but sometimes liners are made of timber for structural rigidity. To fix the profile, suspensions are necessarily used, even if the wall is perfectly flat and the racks will fit close to it.

If the frame is mounted on a wooden wall, then the hangers for fastening the railing rails are fixed on the wall using wood screws. If installation on a different base of the wall is necessary, then it is best to fix the suspensions with driven dowels-nails.
If the finish is fixed on a wall that has a window or door opening, then appropriate guides must be installed along its edge, on which the lining will first be attached, and subsequently the slopes and platbands.
Before starting the installation of the cladding under the frame, all electrical or other cable communications are carried out and fixed, immediately determining the installation locations for sockets and switches, if they are provided on the wall being finished.
Installation begins with the preparation of MDF panels - they need to be cut to the height or length of the wall. The panels are marked with a tape measure and a building corner, the corresponding lines are drawn along which the cut is made using an electric jigsaw, a manual vertical circular or even a conventional hacksaw.


Horizontal installation of panels is carried out in the direction from the floor to the ceiling, and the first canvas must also be perfectly level. Fastening to the crate takes place exactly according to the same principle as with a vertical arrangement.

The socket must be fixed securely, and not bend when inserting the plug of electrical appliances. To ensure a hard stop against the wall, it is recommended to additionally fix wooden fragments of suitable thickness on the back side. The front part of the socket and the switch is screwed onto the facing panels or to the corresponding sockets of the socket.
It is somewhat easier to install MDF panels on glue than on a crate, but using this method, it will not be possible to install insulation.
When gluing, the position of the panel must be controlled by level.
- The adhesive must remain flexible enough even after its initial hardening, otherwise there is a risk of deformation of the panels. A composition should be selected that will not be affected by humidity and temperature changes.
- The adhesive must have a sufficiently thick consistency to be able to be applied in a thick or thin layer, as appropriate, and evenly distributed over the surface to be glued.
 The best option - glue type "liquid nails"
 These requirements in terms of the main parameters are precisely met by the composition "Liquid Nails". The primer that the walls are pre-treated with will create good adhesion for the glue on their surface, so the panels will hold securely on it.
 The adhesive can be applied to the back side of the panels dotted or "snake"
 Therefore, in order to speed up the gluing process, the composition is applied immediately to 8 ÷ 10 canvases, which are pressed against the wall and then come off. After smearing, attaching and tearing off the last of the 10 panels, they glue the first, second, and so on, until it comes to the last. When installing canvases, they need to be pressed very well against the wall surface, and for better fixation, you can even grab each of them with self-tapping screws in two places. They are screwed into the groove of the panel, and then the self-tapping screw is closed by the next spike to be installed.

They can be mounted in different ways, depending on the chosen design - glued to the same glue, installed on special fasteners or screwed to the wall surface with self-tapping screws. Fixing skirting boards to the floor would be a very serious mistake.
Learn how to produce by reading the step-by-step instructions in the article on our portal.
Having become acquainted with the technological process of mounting MDF panels, it is possible, summing up, to formulate their main positive and negative qualities.

So to virtues Such a finishing material includes the following qualities:
disadvantages such panels can be called the following points:
However, it can be noted that despite the above disadvantages, MDF panels are only gaining popularity and fully compete with. The installation of such a cladding can easily be carried out even by one person without outside help, moreover, who has absolutely no experience in such work, unless, of course, he follows all the technological recommendations.
And in conclusion - a small "visual aid" in the form of a video about the installation of MDF panels:
1538 10/09/2019 8 min.
MDF panels are often used as an element of interior decoration.. Such popularity is explained by various positive characteristics, among which it is worth noting an attractive appearance and environmental friendliness. The use of these panels allows you to quickly and inexpensively decorate the premises in your apartment, but how to attach them to the wall? We will talk about this in today's article.
Before starting repairs, many people ask themselves the question - how to fix MDF panels to the wall? To date, there are only two ways to install this finishing material:
In the same way, the panels are attached to the ceiling. about the ceiling. Consider the positive aspects of both methods:

To understand all the subtleties and nuances of both methods, we will consider each of them in more detail.
Knowing how to fix MDF to the wall will help you choose the option that is right for you and your space.
For more information about mounting MDF panels to the wall, see the video:
First, let's look at how to attach to the wall using a crate. We have already said that the crate can be made of wood or metal, so we will consider each of these options. Let's start with the most affordable in terms of finance - frame made of wooden elements.

The manufacturing process is as follows. First you need to go to the hardware store, where we need a wooden block.
An ideal option would be a beam with a cross section of 3 × 3 cm. When choosing, you also need to pay attention to the condition of the beam itself - it should be even, without chips and visible deformations.
Humidity is also of great importance - this figure should not exceed 15 percent. Also in the store you need to purchase antiseptic fire and bioprotection - this is such a special composition that allows you to protect the tree from fungus and mold. In addition, this composition reduces the risk of fire wood.

The composition is applied to the timber with a conventional brush. If something is unclear, then all the information you are interested in is indicated directly on the container with this composition. Now we can move on to measurements. Using a regular tape measure, we measure the width and length of the walls, so that later we can cut the bars of the desired size.
Remember that the length of the bars should be slightly less than the distance between the walls. If you make a mistake in these measurements, then the bars will have to be squeezed between the surfaces, and this will inevitably lead to damage to the material.
The crate can have a vertical and horizontal direction. It all depends on how you will attach the MDF elements to the wall or to the ceiling. mdf for ceiling
Remember that if the panels are mounted across the wall, then the elements of the crate should be horizontal, and vice versa.
Next, we move on to cutting our bars. The work is simple, but even here many beginners manage to make mistakes. To avoid this, position the hacksaw strictly perpendicular to the material - this is how you will achieve perfectly even ends.
The method of fixing the bars depends on the material of the wall surface. If the walls are wooden the bars are fastened with ordinary self-tapping screws.

Self-tapping screws
If the walls are made of brick or concrete, then you need to use dowels. The bars should be strictly parallel to each other, so keep an eye on this moment.
It is also important that the bars are on the same plane, so check them with a level. After making the frame, you can proceed to the laying of the heat-insulating layer.
A good option would be ordinary mineral wool in rolls, which can be cut into pieces of the sizes we need.
Now you can proceed directly to fastening the panels to the crate. There are several ways to fix MDF sheet panels to the wall. The first way is fastening with clamps, which look like a bracket.

Can also be fixed with 3x20mm self-tapping screws and finishing nails with a small head. The choice of one or another option is a purely individual matter, because each person has his own preferences and skills. At the end of the work, corners are mounted on external and internal corners.
It is best to simply glue them to the panels, because any other fasteners will be visible on the surface, which will worsen the appearance of the finish.

Now consider the option using a crate made of metal elements.

Begin with fastening of the wall profile. We mark a line along the perimeter, after which we fasten the elements to the surfaces. They are also fastened to dowels or self-tapping screws - it all depends on the material of the wall surface. Next, we mark the lines along which the profile elements will be fastened.
Each profile bar should be at a distance of half a meter from the other. In order for the frame to be even, straight suspensions are installed along the marked lines, with the help of which not only alignment is carried out, but also the strengthening of the entire structure. Further, elements of the main profile are inserted into the direct suspensions.
Fastening is carried out with small self-tapping screws, and the ends of the suspensions are bent. You also need to ensure that all elements are on the same plane.
For these purposes, the level is also used. Installation of MDF panels to a metal profile is best done using clamps.
Single standard brick is the most common among all types of bricks. its size.
Putty is necessary when carrying out finishing work. learn how to breed putty.
To create concrete and cement mixtures, crushed stone of various fractions is used. Going to get acquainted with the weight of rubble.
We connect them to the profile using small self-tapping screws. It's good if you have a screwdriver with a magnetic nozzle, which will allow you to do all the work much faster. The final step will be the fastening of the outer and inner corners to the MDF panels. As in the first case, glue them on liquid nails.

Now let's look at how to properly fix the mdf panels to the wall, using the adhesive composition for this.
This option is possible if the surface of the walls is perfectly flat, and their finish is sufficiently reliable.
Otherwise, the panels will lag behind the wall along with the plaster or coating that is present there. There is nothing complicated in this work, so you will surely cope on your own if you follow the following recommendations and procedures.
First, we study the state of the wall. If any areas have cracks, then you need them cover with plaster.

In general, the preparation of the wall takes almost more time and effort than the installation of panels on the surface. After leveling the wall Let's move on to primer.

We use a composition with deep penetration, which will improve the adhesion of the adhesive to the wall surface. For work, we use a regular roller, after which we cover all the walls with a primer. You also need to measure all the walls. This is necessary in order to be able to cut the MDF of the required parameters.
The cutting process itself can be carried out manually using a hacksaw, but It is best to use a jigsaw.

On the reverse side, apply the adhesive composition. Remember that the panel must adhere securely to the surface, so for the best effect, we apply glue dots on the wall itself along the perimeter.
Gluing the panels is quite simple. We bring the element to the wall, after which we press it for 10-15 seconds. Thus, work is carried out along the entire perimeter of the wall.
The final step will be gluing the outer and inner corners. We glue them on the same adhesive that we used when working with MDF panels.
There is an option in which both methods of attaching panels are combined. For example, many craftsmen glue on a wooden crate using liquid nails or other adhesives. This option has the right to life, especially in the case when further dismantling of the panels may be required.
I would also like to focus on how fasten the skirting board to the wall. Many people do not think much about this, attaching them to ordinary liquid nails. But this is not the best option, in our opinion. It's better to stick them to the wall with special brackets, resembling hooks.

Their width is 10 cm, and they need to be fixed to the wall at a distance of 50 cm from each other. The method of fastening also depends on the material of the wall, so either self-tapping screws or dowels are used.
We take the skirting boards, after which we firmly attach them to these corners. The joints are masked with the help of corners, and the sections are closed with plugs. Skirting boards can be painted in the future, or a varnish composition can be applied to them.
Before you start fixing the MDF panels to the wall, you need to make sure that you have everything you need. You will need the following set of tools:


You will also need a construction knife, with which we will cut the corners of the desired size. Naturally, we will need a sufficient number of fasteners - self-tapping screws, dowels, etc.
There are a lot of videos on the Internet dedicated to the process of attaching panels to walls in various ways. It is enough to type a request - "MDF panels for walls, how to mount a video", after which your attention will be offered many different options for this work.
Mounting MDF panels to the wall is a fairly simple process that absolutely anyone can handle. You just need to have a minimal understanding of working with tools, as well as the ability to apply this knowledge in practice.
If you follow the tips and recommendations that we have presented to you in this article, then you will absolutely achieve a positive result. Despite the simplicity of work, MDF panels look very aesthetically pleasing in any room, so their use is fully justified.
The modern interior provides a beautiful and original finish, which in a special way emphasizes the style of housing. Therefore, recently, MDF wall panels have been very popular among designers. Unlike wooden planks, they are inexpensive, come in a variety of colors and are easy to install, giving the room an ennobled look.


MDF is a unique building material produced in the form of panels from medium-density fibreboard. Since the boards are produced by dry pressing wood shavings under high temperature and pressure with the addition of carbamide resin, they are ultra-strong and durable in operation.
Decorative finishing with such panels has many advantages.


Despite the presence of positive characteristics, MDF has some disadvantages.


Before you purchase facing plates, it is important to consider that they are produced in different sizes depending on the model range of each brand.

As a rule, products with a thickness of 7 mm to 14 mm and dimensions of 2600 × 200 mm, 2600 × 153 mm, 2600 × 325 mm are most often found on the market. Wall blocks are usually fastened to glue or a crate made of wooden beams and metal profiles. At the same time, the installation of plates on a wooden frame is made much easier, but before starting the installation, the wood should be covered with antiseptic solutions that protect it from the formation of mold and fungus.
To date, MDF boards have found wide application in various fields. They are sheathed with walls, door panels, window sills, ceilings, and screens for heating and ventilation systems and arches are also made from the material. This finish looks chic in a modern interior, as the panels imitate not only expensive woods, but also natural stone.


The installation of MDF, like any other material, must begin with a preliminary calculation of the number of panels. To do this, first of all, determine the area of \u200b\u200bthe room: all the necessary measurements are taken, and the perimeter is multiplied by the height. It is also important to consider the presence of doors and windows in the room. Their quadrature is calculated in the same way, multiplying the height by the width, the result obtained is subtracted from the total area of the room.
Then, knowing all the numbers, you can go shopping for wall panels. Since the products are sold in different sizes, you will have to additionally calculate how many square meters are in each plate. Usually manufacturers write this on packs. If, for example, a panel is purchased with a width of 900 mm and a length of 2600 mm, then it is enough to multiply 2600 mm by 900 mm. As a result, it turns out that in one plate 2.34 m2. Then the area of the room, which is planned for sheathing, must simply be divided by 2.34 m2, and the required number of panels will be obtained.


An important point before starting the MDF sheathing is the preparation of the tool. Since the installation of wall panels is not particularly difficult, it is quite possible to do it yourself, without resorting to the help of specialists.
To do the job quickly and efficiently, you need to have a basic set of tools at hand.

In addition to the above, you will also need the usual tools that everyone has in the house: a screwdriver, a knife, a hammer, drills and a marker.
Before sheathing MDF walls, it is necessary to determine how to fix them. You can install decorative panels with glue or on the crate. Each of these methods is characterized by its installation technology.
Before choosing, you should evaluate the condition of the surface, taking into account some of the nuances.

The installation of wall blocks on the frame is as follows: guides are attached to the surface, which serve as the basis for installation, then MDF is fixed to the metal profile or bar.
This technique has many advantages.


As for the disadvantages of such a sheathing, it significantly reduces the area of \u200b\u200bthe room, and if you need to hang furniture or decorative elements on the walls, then it is worth considering that the design will not withstand such loads.
Unlike the previous technique, landing on glue does not have significant disadvantages. MDF boards are attached directly to the wall, in this case glue is the connecting element. To fix the panels together additionally, clamps are also used. Thanks to this finishing option, the area of \u200b\u200bthe room does not decrease, installation is carried out quickly, without damaging the material with self-tapping screws or nails. But if the surface of the cladding is damaged during operation, then not one fragment of the finish, but the entire wall, will have to be restored.
When deciding on the choice of a particular method, it is worth considering not only the features of the room, but also calculate the cost of sheathing. For example, in some cases it is much more economical to putty the walls and not build a frame. For large rooms, of course, it is best to install a crate, since it will be problematic to perfectly align their walls.

Due to their performance characteristics and aesthetic appearance, MDF panels are widely used in finishing works. Wall panels can not only decorate the ceilings of the corridor, the passer-by, but also originally sheathe the doorway or window slopes. Furniture fittings and wall corners are also easily made from the material at home. Since the product is easy to install, it is quite possible to do all the work with your own hands. Before fixing MDF, you should prepare the surface for finishing by cleaning it of the old coating and eliminating all defects.


Regardless of whether it is planned to be sheathed on concrete, wood or brick, the base must be primed, this will protect the finish in the future from the appearance of mold and fungus.
For additional thermal insulation of window slopes, walls and doorways, it is recommended to lay insulating material, it will not only serve as a good insulation, but also cope with the task of vapor and waterproofing.


To install the panels on the slopes, they can be fixed along or across, it all depends on the size of the slope. This finish, made from a combination of light and dark pieces of slabs, looks original. Installation of panels on walls and ceilings is carried out both on glue and on a pre-assembled frame. To do this, first the starting profile is attached, and then the guides, along the length of which it is necessary to properly join the decorative details. To make a beautiful corner, before installation, trim the material, rounding its edges.
Sawing or cutting panels is recommended using special tools for working with wood. A jigsaw is considered the best option for this, but if it is not at hand, then a saw with fine teeth will do. Having decided on the direction of the MDF sheathing, the panels are measured and cut to the desired length. At the same time, it is necessary to cut off the spike along the entire length of the first plate, if this is not done, then difficulties will arise when installing the corners.


When choosing a method for attaching MDF to a crate, you will first have to make a solid frame from a metal profile or wooden beams. At the same time, it is worth paying attention to the fact that the wooden structure requires pre-impregnation with antiseptic solutions that will protect it from rotting and mold. If it is planned to lay thermal insulation, then the thickness of the bars is chosen according to the thickness of the insulating material. For sheathing brick walls and rooms with high humidity, a wooden frame is not recommended.
So that the wooden beams do not deform during installation, it is worth choosing a well-dried tree. They fix the structure perpendicular to the direction of installation of the panels, leaving a small margin of 5 cm from the floor and 3 cm from the ceiling. First of all, vertical elements are fixed, which are placed along the edges of the recesses, in the corners and next to the openings. Planks should be located at a distance of 700 mm from each other. For fastening the structure, self-tapping screws or nails with a diameter of 4 to 6 mm are usually used.


To assemble a metal structure, UD racks and CD horizontal profiles are used. The pitch of the crate is similarly 600-700 mm.
The CD profile is inserted into the rack and everything is fixed to the wall with self-tapping screws. Metal profiles can be cut with a special circular saw. If the ceiling is trimmed with panels, then the frame must be assembled only from horizontal elements, using additional fasteners.


After the frame structure is ready, proceed to the paneling. MDF boards are fixed to each other using a tongue and groove lock, consisting of a recess and a ridge. The parts are fastened to the wooden crate with small nails, they are hammered obliquely with a hammer. To install the material on the metal profile, clamps are used, they are placed in the groove of the plate and fixed with self-tapping screws.
When installed vertically, MDF begins to be fixed from the corner, smoothly redirecting to the left side. The first plate is attached to the beam with nails, and from the side of the groove, fixation is carried out with clamps. Then the crest of the next plate is placed in the groove of the first. The last panel should be cut to length, leaving a small margin of 5 mm, and its comb cut in half. It must be inserted into the groove of the previous panel and secure the free edge.


For sheathing slopes, pieces of wall slabs are used. To beautifully close the skin, use special corners. They are planted on liquid nails or glue, decorating the edges near doors and windows. In addition, MDF is great for finishing the ceiling surface, in this case, the panels are installed in a direction perpendicular to the base of the walls.
MDF wall panels - boards made from wood fiber by dry pressing wood chips. This building material has a medium density, and to give it a high degree of strength, sawdust is mixed with carbamide resins and processed using high temperature and significant pressure. Finally, the MDF panel is further processed to obtain an aesthetic appeal.
MDF for walls is harvested according to the same technology, but their surface finish is always different, in this regard, several types of these wall panels can be distinguished:
MDF panels are distinguished by improved technical characteristics. When creating them, the manufacturer does not use harmful resins rich in phenol.
After crushing and processing wood chips, the resulting dust is processed under the influence of high temperature in special furnaces. The process lasts until the release of lignin, which ensures the bonding of raw materials.

The main advantages of the MDF panel are:
There are several ways to fix MDF wall panels in the course of work related to decorating the surface of the walls inside the room. One of them requires the assembly of a frame and battens, while the other requires a special adhesive for wall panels.
To assemble a high-quality frame and battens, wooden bars or a metal profile are used. Both designs are necessary for fastening decorative material in the design of residential and office premises. The methods of attaching panels to the frame allow not only to visually change the interior space, but also to hide certain defects found on the surface of the walls. When choosing how to fix, you need to take into account the degree of unevenness of the base. Significant flaws in the form of voids, dips or bumps can be corrected with a high-quality frame and crate.
Fastening wall panels to the frame is necessary in the course of work related to leveling the surface. In rooms with high humidity, only a metal profile is used to build the frame. The construction of the crate allows for the installation of additional insulation. The frame for fastening the panels with your own hands in a dry and warm room is assembled from a wooden beam: prepared wood (bars with a section of 30x40) must be installed and fixed strictly vertically around the entire perimeter of the room.
The very first (starting) profile is attached directly to the floor, the second - to the ceiling. Having installed horizontal profiles around the entire perimeter of the room, they begin to mount the vertical guides. The distance between the bars does not exceed 60 cm. This is due to the fact that the dimensions of the MDF panels are as follows:

Installation of MDF panels, metal profiles or bars starts from any corner of the room by laying individual elements vertically or horizontally. If it is necessary to create additional noise or heat insulation, insulation boards are placed between the battens of the crate.
The distance between the rails in this case depends on the parameters of the thermal insulation material used. It is less than the width of the insulation by 2-3 cm, which allows you to tightly lay the mineral wool slabs.
Each MDF panel is equipped with a special groove for installing clamps and fastening to the frame. The frame itself is fixed with the help of "crabs" and brackets. Fastening MDF panels to the wall cannot be called a complicated process if the frame of the structure is assembled correctly and strictly according to the level.
When creating a crate, it is important to remember that the fasteners (self-tapping screws), or rather their length, are selected taking into account the thickness and height of the bar or profile. The self-tapping screw must be inserted into the wall to a depth of at least 40 mm.
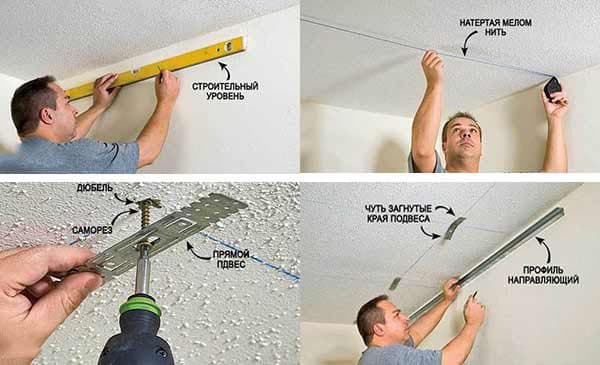
Before constructing the frame, you need to determine the highest point on the wall surface and set the vertical and horizontal from this value. All work is carried out under constant control of the building level, equipped with a spirit level. It is necessary to check not only the horizontal and vertical, but also both diagonals on each sheathed wall.
The dimensions of MDF panels are of great importance when it is decided to attach them to the wall using a frame, and when performing work using a special adhesive composition, certain types of panels are chosen.
It is more difficult than to sheathe a correctly assembled frame with such panels.
Before attaching MDF panels to the wall, you must:
Knowing how to fix MDF panels to the wall, you can complete all the work in the shortest possible time. It is necessary that the surface was not only carefully prepared, but also absolutely flat. It is necessary to glue the MDF panels on the wall in such a way as to ensure a complete fit and avoid air from entering under the components of the structure.

If a tile or ceramic tile is glued to the walls in one motion and cannot be dismantled and re-glued, then the peculiarity of the process of gluing MDF panels is that the future sheathing cannot be glued immediately. It must be pressed against the wall, held for a few seconds and torn off. After that, allow the glue to dry slightly and reattach the panel to the wall surface. MDF can be glued only by applying considerable force when pressing the panel.
With improper or poor-quality preparation of the wall surface for gluing MDF panels, the fixation will not be strong and durable.
Panels with adhesive applied to their surface must be laid on a clean, dry, absolutely even and smooth wall. The quality of the sheathing also depends on how correctly the first panel was glued. It must be fixed in strict accordance with the vertical mark made using a plumb line or laser level level.
The final stage is the installation of plugs and other decorative elements. The inner corners are fixed with glue. Its color is selected exactly to match the finishing material and applied with a thin snake, trying to avoid the appearance of excess on the panels after pressing the corner.
You can study in detail all the stages of the work by watching the video.
Interior decoration using MDF wall panels is very popular due to the many positive qualities that this finishing material has. This is not only an opportunity to perform all manipulations without the involvement of qualified specialists, but also to increase the strength and reliability of the structure. MDF wall panels allow you to change the interior space of the room, giving it attractiveness and increasing its aesthetics.


