Reading time ≈ 8 minutes
One of the important points, which largely determines the success of fishing, is atmospheric pressure. If the indicator changes dramatically, then the bite is sometimes completely absent. Therefore, it will be quite useful for a fisherman to have at home such a device as a barometer. Since display meters are not cheap, many people are thinking about designing such a device on their own. Consider a master class on making a barometer for fishing with your own hands using simple materials.
The barometer is useful not only in everyday life, but also for an amateur fisherman. Today it is not difficult to know the weather. But it often happens that information from different sources is quite different and it is quite difficult to understand which testimony to believe. In this case, a barometer comes to the rescue. If it shows a drop in pressure, then it is raining, if the arrow points to its increase, the weather will be sunny.
A fishing barometer is an important device, but besides this, you need to know and take into account the physiology of the fish that you intend to catch:

In order for the barometer to serve its owner for a long time and not cause any problems, attention should be paid to the following points:
Below are popular models with photos:

A fishing barometer can be assembled from the simplest and most affordable materials that can be found in almost everyone on the farm. Consider a master class on making a barometer for fishing with your own hands.
The main element of such a barometer is a glass bottle.
A plastic container is not suitable for such a product, since it will shrink and expand during pressure surges.
In addition to the vessel, you will need a cork and a tube, for example, a dropper. A hole is made in the cork for threading the tube: it must fit into the cork very tightly to ensure the tightness of the container. The device is assembled as follows:

For such a device, you will need an ordinary light bulb, even a burnt one will do, since a flask is important for assembling a barometer. To make a display meter, near the base part in the glass, you will need to drill a hole with a diameter of 2-3 mm. Since the hole is not so easy to make, you need to follow these steps:
After the light bulb has been prepared, it is half filled with tinted liquid and hung up. In summer, the device is placed on the street, in spring and autumn - inside the window between the panes, in winter - transferred to the room.
You can navigate using a homemade barometer as follows:
Since ancient times, Siberian fishermen and hunters have used branches of coniferous trees as a reference point for approaching weather: if they rise, it means that the weather will be clear. Therefore, they can be used as a kind of barometer, which will serve as a guide to the upcoming weather.
To construct such a device, you will need a small part of a dry tree trunk about 30 cm long, on which there will be a branch of the same length. The bark is first removed from the trunk and branches, after which they are mounted on a board, which is fixed on the wall. The branch should be positioned in such a way that during raising and lowering, its free end moves along the wall and does not reach it.

During the raising of the branch, this will indicate sunny weather, if it is lowered, it will indicate the upcoming bad weather.
On the board, you can fix or apply a scale with divisions of 1 cm. After some time, it will be possible to understand how the branch moves depending on weather changes, and apply the appropriate inscriptions, for example, rain, sun or variable.
A simple barometer can be made from a metal oil can with parallel sides. For the oiler hole, you need to choose a suitable plug that will tightly close it. Before installing the cork, a hole is made in it for a glass tube with a diameter of about 1.5-2 mm. The vessel is filled 2/3 with tinted water and the tube is inserted into the cork, after which the hole is carefully closed.
The barometer is fixed on a stand, and to take readings, a scale is made near the tube or a ruler is fixed.

The scale can be calibrated according to this instrument.
If a metal container could not be found, almost any small glass bottle can be used. As atmospheric pressure changes, the liquid level in the tube will rise or fall.
For the manufacture of the design you need to prepare:
The elements are connected to each other according to the scheme. When the device is ready, it is fixed on the wall so that the window, the sun's rays and the kitchen do not affect its readings. Boiled water is poured into the barometer at room temperature +18°C and atmospheric pressure 750 mm Hg. Before pouring the liquid, the piston of the upper syringe 1 should be set at the 7 ml mark, while water up to 10 ml is started to be poured into the body of the second syringe (without a piston). After pouring through the piston of the first syringe, the level in the tube is set at around 750 mm.

The barometer works on the principle of contraction-expansion of a closed volume of air during a change in atmospheric pressure.
The main part of the air (98%) is in the upper syringe and only about 2% is in the tube. When the pressure rises, the air is compressed and the water level in the tube rises, and, accordingly, vice versa, decreases during the pressure drop.
The scale step of the device in 1 mm is equal to 1 mm Hg. The dimension of the scale is determined by the amount of closed volume of air. If the air is compressed by 1 mm, the water in the tube also rises by 1 mm. The body of the second syringe is placed on the same level with the scale.

At first, it is recommended to record the barometer readings, while noting the weather conditions. It is desirable to take readings at the air temperature in the room at +18°C. When the records contain the necessary data corresponding to different weather, it will be possible to quickly navigate by the barometer and make a decision whether to go fishing or not.
It is not always possible to buy a barometer, so I want to propose the design of a home barometer, which will show atmospheric pressure with some accuracy.
The barometer (see figure) consists of a bottle with transparent glass, a glass tube and a cork. The bottle is one third filled with water, it is better to take distilled water, since ordinary water blooms in a year. Water can be slightly tinted. A hole is made in the cork into which a glass tube is inserted. The junction is covered with plasticine. Now it remains to plug the bottle with a cork. The barometer is ready. When atmospheric pressure begins to change, the water level in the tube will change. If air bubbles begin to come out of the tube, then the pressure is very high, and this is for clear, stable weather, at such a time there is a good bite. If water starts pouring out through the top of the tube, the pressure is low, you can expect a storm, but you should not go fishing.
The simplest do-it-yourself barometer
Such a barometer can be made from a small tin oil can with parallel sides.
Pick up a cork that tightly closes the only hole of the future barometer. Before you put the cork in place, you need to make a hole in it of such a diameter that you can pass a transparent tube-straw for cocktails through it. However, it is better to use a glass tube with an inner hole diameter of 1.5 - 2.0 mm.
The container is 2/3 filled with tinted water, a tube with a cork is inserted into the hole, while in the tube

Fix such a barometer on a stand with a vertical ruler. You can calibrate it by taking readings from a real barometer.
Instead of a metal container, you can use any small glass bottle. After filling with tinted water and fitting the stopper with the tube, add some water to the tube. Since the body of the barometer is rigid, when the pressure increases, the water level will decrease, and when it decreases, it will rise.
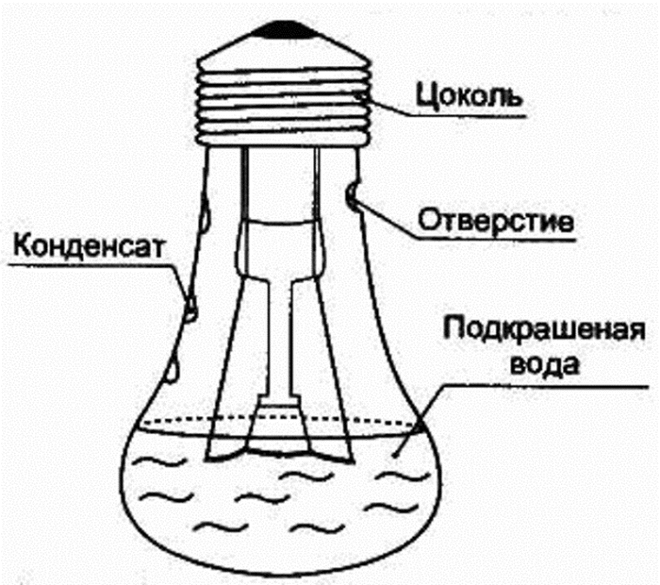
Burnt out light bulb barometer
Take a burned out electricallight bulband where the base with the threaded part begins, carefully drill a small hole with a diameter of 2-3 mm. This should be done very carefully, otherwise the balloon may crack or break.
Here is the easiest way to drill glass. At the point where you marked the hole, apply a drop of machine or sunflower oil. Take the abrasive powder from medium-grained sandpaper and add it to the oil drop to make a viscous paste, a little thinner than toothpaste. Then clamp the copper wire in the drill chuck. Its diameter should match the size of the hole you want to drill. Gently clamp the lamp base in a vise. And wrap the glass flask with a towel or rag. You need to drill very carefully, applying minimal effort.
When the hole is drilled, fill it with tap water, filling the glass flask halfway. Then add two or three drops of ink or a piece of indelible pencil lead to it and mix. The barometer is ready.
It remains to wait until the inner wall of the flask dries out, and hang the barometer between the window frames. It is best on the north side, where direct sunlight will not fall on it. If the windows face south, install at the top of the window. After a few hours, you can take readings. Our barometer can predict the weather for the day quite fully. Overcast or partly cloudy awaits us, or it will rain a little, long, short-term, maybe thunderstorms ...
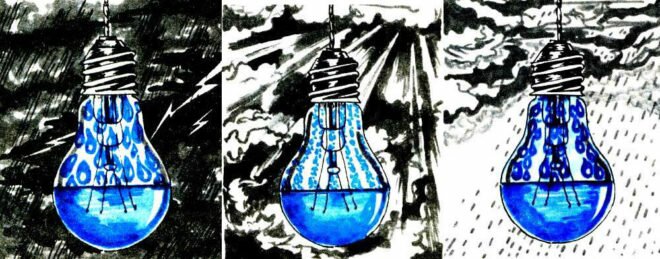
True, you need to know some features in order to decipher the testimony:
If the inner walls light bulbscovered with small drops of condensed water - tomorrow it will be overcast, but without precipitation.

If the walls of the light bulb are covered with drops of medium size, and vertical dry stripes form between them - partly cloudy.
Everyone can make a barometer with their own hands. Homemade models made from spruce branches, light bulbs or electronic devices can record changes in atmospheric pressure with sufficient accuracy. And for their assembly you do not need special tools and special knowledge.


The main thing in the manufacture of such a device is to observe safety precautions. You need to work in a well-ventilated room with a constant temperature. It is advisable to use safety goggles and gloves.
And most importantly - do not be afraid to fantasize. Then the barometer that you make with your own hands will be not only functional, but also stylish.
Of course, the accuracy of a home-made device will be lower than that of industrial designs. But it will be enough to predict the weather in the near future.
And not always a change in pressure provokes a change in the weather, this must also be taken into account.

Instruments for detecting changes in pressure can be assembled from the simplest materials that can be found in any home. They can be useful at home or in the field, in the country or for fishing. For example, if the pressure is slowly increasing, the bite will be good, and if it is already high or rising rapidly, fishing will not be successful.
The simplest models of barometers can be assembled from a few items at hand.

To make a barometer in a lamp, it is necessary to drill a hole with a diameter of 2-3 mm, always in a flask near the junction of a metal base with it. In order to do this, you need to apply a drop of machine oil to the place of the future hole and then dilute it with abrasive powder to a viscous state.
It can be taken from sandpaper. Then, using minimal effort, drill the glass with copper wire of the desired diameter.


For drilling, it is advisable to wrap the base with a soft material, for example, several layers of cloth or paper, and carefully secure it in a vise. It is desirable to achieve complete immobility, otherwise vibration may occur during drilling(especially if the chuck on the drill does not center the drill very accurately), and thin glass can crack.
Or you can drill with a conventional drill, completely immersing the lamp in water. Then you need to firmly hold the lamp with your hands, and do not work alone. In both cases, an electric drill is used.

After that, shake out the filament as far as possible through the hole, and then wash and dry the lamp. Fill the container with distilled water up to half of the flask. You can use "holy" water saturated with silver ions.
The liquid must be purified, otherwise it will bloom. For greater clarity, you can add a little potassium permanganate or ink from a fountain pen to it.


Rules for using such a barometer:
If you need a more convenient device with an arrow, then other designs will suit you.

You can determine the change in pressure by looking at the branches of spruce and other conifers. Before the rain they fall, and before the sunny weather they rise. Such properties are preserved even in a dry branch.
To make a barometer, you need a base in the form of the letter "G". It can be made from boards or plywood, the size is determined by the size of the branch. It is desirable to attach rubber feet to the base.
On the wall you need to stick a scale drawn on cardboard or thick paper.

Then the device needs to be calibrated. To do this, put a mark on the scale in clear sunny weather. Another mark must be made during heavy rain. Well, divide the distance between them into several equal parts and put dashes. The device is ready.

Do not want to break off a branch from a tree? It doesn't matter, a large spruce or pine cone is perfect for the original barometer. The principle of operation is based on the fact that it can open in clear weather and close before rain.
The base is no different from the previous design. Instead of a branch, a cone is attached to the lower face, to one of the scales of which you need to glue a cardboard or paper arrow. The design of the base and the method of graduation are similar to the version from the branch.

When there is no forest nearby, a good barometer can be made from a large glass bottle or jar. Plastic containers are not suitable, as they do not have sufficient rigidity. To the selected container, you need to find a wooden or rubber stopper that closes it tightly.
First, make a hole in the cork and insert a glass tube into it, which should reach almost to the bottom. Its diameter must be large enough so that when pressure drops through it, water does not pour out.

A clear plastic straw will also work, but the result will be worse. It can be fixed with sealant, plasticine, adhesive tape or hot melt adhesive. The main task is to ensure tightness so that air cannot enter the bottle through the joints.
Next, pour tinted water into 2/3 of the bottle. Then correct the air pressure inside the appliance if the water level has not reached the middle of the tube. This should be done when the atmospheric pressure is 760 mm Hg. Art. To do this, you need to blow air through the tube or, for greater accuracy, use a syringe with a needle.

After that, calibrate the device by checking with the factory model or according to the weather forecast. As a general rule, as the pressure increases, the liquid level in the tube drops and the weather will be sunny.
Sometimes the water from the straw can overflow. In this case, the atmospheric pressure is low, and inside the instrument it is high. So, you need to release excess air. When bubbles are released from it, the air pressure inside must be increased. And if both of these phenomena are alternately observed, reduce the amount of water or find a wider tube.

This is a more compact version, similar in principle to a bottle device. Its measurement accuracy is lower.
The device consists of an oiler, a cork and a glass tube. To make, make a hole in the cork and insert the tube into it. After that, fill the oiler with tinted water and close the cork. Coat all joints with sealant or hot melt adhesive, you can even use rubber from a children's inflatable ball to seal.
In general, a similar design can also be built from medical syringes. But only glass ones, which are difficult to find, are suitable for this. The measurement accuracy of such devices will be even lower.


It is possible, while the assembly is not difficult, even a novice radio amateur can handle it. Components for its manufacture can be bought at any radio market. Such devices have greater measurement accuracy and ease of use, stylish design and compact size.
The sensor of our device is a silicon plate, which works as a strain gauge.
To register changes in atmospheric pressure, you can use an accurate voltmeter or, as in our case, several LEDs of different colors.

The device is powered by a Krona battery with a supply voltage of 9 V. To save battery power, the device works only when the power button is pressed and shows a change in atmospheric pressure up or down relative to the absolute value. This value is set manually at known atmospheric pressure.
The figure shows a schematic diagram of the device.
To amplify the strain gauge signal, the circuit uses a differential amplifier consisting of two operational amplifiers DA2.1 and DA2.2 in a package (LM 324). For their precise operation, a variable resistor R4 is provided. The output voltage of the amplifier is about 1 V.
For convenience, the list of parts and their characteristics are summarized in the table.

The hardest part to make is the printed circuit board. It is made on one-sided foil fiberglass. Its diagram is shown below.

A homemade board can be made from a piece of plywood without completely driving small carnations into the future nodal points. The tracks in this case are laid using insulated wire. The installation of such a "board" is very laborious, and its reliability will be lower than the printed version. But for domestic purposes, this option is quite acceptable.
A barometer is an instrument that measures atmospheric pressure. The first of them, invented in Italy in 1644 by E. Torricelli, was a plate filled with mercury and a test tube placed open end down. When the pressure was increased, the mercury rose through the test tube, and when the pressure was lowered, it fell.
The described design was inconvenient, therefore, an aneroid barometer came in its place, in which water was replaced by a box made of thin corrugated metal. It also has a breakdown. When the pressure drops, the box expands, acts on the spring, which shifts the arrow on the dial. The same thing happens with increasing pressure, but in the opposite direction.

Despite the existence of a large number of different in shape, size, accuracy of instruments, the people made them on their own, using information obtained from observing various objects with a change in pressure. There are many do-it-yourself barometer projects offered by craftsmen.
The simplest homemade barometer in design has a transparent bottle, a long glass tube, and a cork.
The bottle is filled with a third of the volume of water. It is better to use distilled, as the usual blooms quickly. For clarity, the liquid is tinted.

The cork is drilled along the axis, pierced, making a hole. A tube is inserted into it, the junction is sealed with plasticine. The bottle is closed with a tube. The lower end of the tube should be located in the water column.
The barometer is ready. The change in pressure causes the water level to move inside the tube. If air bubbles rise from the latter, this indicates increased pressure. If water pours out, then it is worth waiting for bad weather. You can stick a vertical scale on the side of the bottle and, observing the weather and the level of liquid in the tube, draw up a scale, according to which in the future you can navigate where the weather changes.
An even simpler barometer can be made from a glass jar, a balloon; stationery gum or tape; bamboo skewers or straws; colored paper for the arrow and scale; stationery clip-clothespins.
Close the neck of the jar with a ball, fix it using an elastic band or tape.

A small triangle is cut out of paper and glued like an arrow to the end of a bamboo skewer. The second end of the skewer is placed on a stretched ball on the neck of the jar. Fix it with tape.
A strip of paper is cut out of paper longer than the height of the can. Fix its end in a clerical clip and position it vertically so that the point of the arrow at the end of the skewer is approximately in the center of the paper strip.
When pressure changes, the ball on the neck of the jar will rise / fall. The position of the arrow is fixed with a felt-tip pen, a pencil on a vertical strip of paper. This is first tied to the readings of a factory barometer, and later a well-formed scale will suffice.


