There are several basic designs of lifting gates, each of them has its own principles of operation. The definition of "lifting" speaks for itself - this means that the door leaf is raised with the help of a certain effort, which can be done manually or using automation. In this article, we will provide instructions for the manufacture of various types of such gates.
Lifting gates can be divided into three main classes: rolling, sectional and solid.
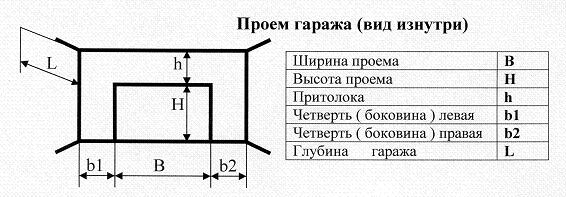
The choice of the optimal garage door size depends on the following criteria:
The calculation of the optimal size of the opening for a sectional door for a car looks like this:
We have calculated the minimum allowable dimensions of garage doors. When drawing up a sketch or drawing, it is more appropriate to round these values to the nearest whole number. We round the gate height to 2 m, and the width to 3 m.
It is necessary to purchase all items in accordance with the specification. As sections, mainly sandwich or metal panels are used, much less often - wooden slats.
Sandwich panel consists of two metal plates coated with protective compounds and insulation between them
Since the panels are interconnected by special flexible elements, the easiest and most convenient option is to buy a finished sectional canvas of the right size.
The sectional leaf is closed at the bottom with an end profile. From the sides it is closed with side plates, which give additional rigidity and protect the end part of the gate from external factors. Metal channels are used as guide profiles. As angular vertical profiles - metal corners. Brackets are also made of metal profile. For the lifting mechanism, you must purchase:
When manufacturing and installing sectional doors, you will need a standard set of tools:
Personal protective equipment should not be neglected either - for work you need to purchase construction gloves and goggles. If the gate has a significant height, then you need to take care of the presence of a stepladder.
There are two types of automatic mechanisms that are suitable for automating sectional doors.
Almost all electric drives are equipped with a safety system that prevents the blade from falling during a power outage. Various additional functions can also be useful when operating the gate:
When buying automation from well-known European brands, you will never regret your choice, because they really produce high-quality and reliable equipment. Installation of an automatic system is as follows:
The drive with a torsion mechanism is fixed on brackets to the ceiling and connected to the door leaf with a lever
It is necessary to bring power, control and signal cables from photocells to the drive mechanism
The opening for up-and-over doors is calculated similarly to the opening for sectional doors. You need to know the exact dimensions of your car and the angle of approach to the gate relative to the main road.
At the stage of designing the entrance to the garage, you should think about the possible change of the car, and, consequently, about the possible increase in its dimensions.
The swing gate leaf is a one-piece shield, which can be made of any material. The cloth can be lifted by hand or by means of the electric drive. It is driven by a lever through a tensioned cable and moves along horizontal rails with the help of sliding rollers attached to its ends. The opening is framed with a steel frame to distribute the load. To limit the opening angle, special springs are installed.
When drawing up a sketch, you need to measure the distance from the gate to the main road. This distance should be sufficient so that the car that drove up to the garage does not interfere with the lifting of the canvas, since in any case it will conceal a certain space before entering the garage.
The leaf of the up-and-over gate is usually made by hand, and the components are purchased from the factory.
To calculate the material for the web, you need to subtract the thickness of the steel frame from the height and width of the opening. There should be a minimum gap between the canvas and the frame, allowing the canvas to move freely in the opening.
When choosing a material, one should be guided primarily by the desired degree of burglary resistance and thermal insulation, the allowable weight of the canvas and the decorative properties of the coating:
The coating of the wooden surfaces of the gate needs to be updated from time to time to protect them from weathering.
To perform the work, you will need the following set of tools:
Step-by-step instructions for making a gate from a metal profiled sheet:
The spring is attached to the frame of the lifting mechanism and to the locking bracket.
The automatic lifting mechanism significantly increases the comfort of using the gate, it makes it possible to control them from a remote control. The electric drive on the gate is selected based on the required lifting height, area and weight of the leaf.
The installation process of the electric drive is fully described in the instructions for the device. In general, the setup looks like this:

Guided by detailed instructions, you can make and install various types of lifting gates with your own hands. Independent work will save the family budget and bring the most original ideas to life.
In the garage, you can put any gate, including the popular lifting. Despite the complexity of the design, there is nothing difficult in installation. With a strong desire and the availability of the necessary tools, you can make a lifting garage door with your own hands without any problems.
Gates that do not open like doors, but go up to the ceiling, are assembled from several parts:
This design is in great demand among garage owners, as it has a lot of advantages.
Lifting gates are characterized by the following positive qualities:
Despite the advantages of overhead doors, some garage owners find strong arguments against installing them.
The following disadvantages of this design can force the owner of the garage to change the decision regarding equipping the garage with lifting gates:
You can turn a blind eye to certain shortcomings of the lifting gate. Some car owners ignore the fact that the door structure that goes up is mounted only in a rectangular opening. The fact is that this disadvantage is compensated by the wide possibilities in finishing the canvas. For example, small windows made of glass containing a wire mesh in the thickness can be built into the leaf of a garage door.
The gate, which goes up to the ceiling, allowing the car to drive inside the garage, looks like a flat canvas that completely fills the opening. In order for it to rise easily, it must be supported by a rigid frame, securely attached to the wall of the room. The leaf of the lifting gate moves up or down along the side profile, which acts as a guide.
The canvas is moved from its place by a special mechanism consisting of springs, levers and rollers. The sash, which these elements set in motion, rises along the guides and goes up, after which it slowly takes a horizontal position and becomes parallel to the ceiling.
Easy and quick lifting of the canvas up is provided by springs. When the gate is locked, it expands. And they are brought into a compressed state by the opening of the door structure. Springs and all other elements of the mechanism for moving a single gate leaf can be forced to perform their task both manually and automatically.
The opening of the lifting gates at the touch of a button is carried out by an electric drive, which must be specially equipped with a door structure.
The first task that a car owner needs to complete, on fire with the idea of \u200b\u200bmaking a lifting gate, is to draw up a drawing. It will not be possible to do without it, since the final result of the work depends on it.
A diagram indicating all dimensions is a document that can protect against the manufacture of skewed gates. By the way, when constructing a lifting door structure, it is desirable to have at hand not only a simple schematic representation of the gate, but also a plan with their isometric projection.
In size, the lifting door structure should be 10 cm larger than the length of the opening. By adding these centimeters to the parameters of the gate, it will be possible to avoid the appearance of gaps between the lifting structure and the walls of the garage. A large room may require the manufacture of gates with dimensions of 6x2.2 m. And the frame itself, created from steel or wooden elements, should be made taking into account the size of the opening.
Having finished with drawing up the drawing, it is necessary to arm yourself with a pen and a notebook in order to note in it what will be needed in the process of manufacturing lifting gates.
To put a lifting gate in the garage, you need to prepare:
Most of the requirements are imposed on the material from which the canvas itself will be made. To create a lifting (it can be folding and folding) sash, boards with a thickness of at least 2.5 cm, corrugated board and plastic panels are suitable. You can make a canvas from ordinary sandwich panels. Plank shields are considered to be the same good material.
The canvas of the rising door structure cannot be made from solid wood. Otherwise, the sash will be heavy. In addition, in the rain and snow, it will dampen and swell.
If, after making the door leaf, the owner of the garage intends to insulate them, then he can use basalt wool or expanded polystyrene. These materials comply with fire safety requirements. Having insulated the door structure, it is possible to sheathe it with a galvanized steel sheet, which will protect the metal parts of the gate from rust.
For measurements, you will need a metal tape with divisions (tape measure), a building level and a corner. In the future you will need:
To make a gate that, when opened, goes to the ceiling, you will need to perform the following steps in turn:
After that, you should take care of protecting the garage from intruders by equipping it with locks and latches. It is worth thinking about how and with what to insulate home-made lifting gates.
The garage can be protected from heat loss if the inside of the lifting gate is covered with foam. This material is characterized by high rigidity, does not absorb moisture and does not allow warm air to escape. The quality of the foam, despite the low price, is beyond doubt. In addition, this material is easy to work with, because it weighs little.
It is first necessary to process all the holes between the frame and the canvas with mounting foam. This tricky trick will save the garage from heat loss through the door structure and the occurrence of a draft. Then you need to coat the gate leaf with a primer or paint that protects against rust. When the coating dries, it will be possible to proceed with the thermal insulation of the door structure.
Styrofoam can be laid on the metal surface of the gate or pushed between the joists of the crate. If you liked the first option, then the insulation will just need to be glued to the sash. And when choosing the second method of laying foam, the first thing you need to do is create a frame from a wooden lining, and only then deal with insulation.
Later, in order for the gate to open and close without difficulty, it is recommended to adjust the tension of the spring by turning the nut. If this does not help, you can change the fixing location of this element. Roll-up gates will easily tip over if they are equipped with a door handle outside at a distance of less than 1 m from the ground.
The main condition for the successful completion of the construction of lifting gates is the correct preliminary calculations. In addition, in order for the door structure delivered to the garage to cause pride, and not regret, you need to take on its manufacture, having skills in construction.
To ensure the long-term safety of the car, it must be stored in a place that will protect it from the effects of rain, frost, etc. But atmospheric phenomena are not the worst thing that can harm the car, so you should equip garages with reliable gates. Well suited for such a task, and also distinguished by their unusual design, rotary lifting gates. Next, we consider the features of their design, drawings and the sequence of manufacturing with our own hands.
The advantages of such structures include:
Flaws:
Despite the need to have basic skills in handling a welding machine, as well as some other tools, almost everyone can make a swing gate with their own hands. In the process of work, you need to use the correct drawings and work exactly with the specified data.
List of main parts of swing gates:
For the sash, it is better to use materials with low weight indicators - this will reduce the level of load on the structure, which will ensure its long and trouble-free operation.

When making a gate frame with your own hands, you need to be guided by the dimensions of the garage opening. It is optimal to choose plank boards or wall panels as the material of the valves (used for finishing structures). If necessary, insulation is better to use non-flammable materials.
It is especially important before making it yourself to decide on the type of mechanism that will move the sash from one position to another. It can be in the form:
The second option is easier to make with your own hands, but it implies the need for more materials to create.
To make homemade swing gates of the lifting type, you need to prepare:
Specific data on the amount of materials, their dimensions and parameters must be taken from a specific drawing selected or created for a specific garage.

When doing work with your own hands, you need to make sure that it is done in strict accordance with the selected or created drawing. Each process must be taken with all responsibility - a small mistake can cause problems with the operation of the mechanism. If you are not completely sure that the work is done correctly, it is better to read the special documentation or ask for advice from a professional who will help you navigate in a particular case.
This option and type of gate will be optimal for self-production. This does not require much time, or any specialized skills. In fact, to make a gate with your own hands, you will need:
To begin with, you should finish any work inside the garage. The design feature implies that dust entering the guides, or on the rollers, can interfere with normal functioning, malfunctions. Again, the floor should be finished after the installation of the gate, since they (the frame) should go deep by at least 2 cm. The walls, the garage opening should be even so that the guides can be easily installed.
The next step is to measure the opening. This is how you can determine how high the guides are needed, what sizes the shield will be. On fig. 1 is an example of what sizes you will need.
The next action to be taken is the manufacture of the frame, the base of the gate. Here are a few options for you to use:
The final choice is yours, but still, the metal will be more reliable. Once the frame is welded, it should be tried on in the opening to eliminate various errors or miscalculations. If the frame is level, you checked its position both horizontally and vertically, it should be fixed at least on anchors. Your frame should look like this:

If you have gaps between the wall and the frame, the gaps should be blown out with building foam, and then fix the horizontal rails, which should be under your ceiling.
After you install the frame, you should weld the brackets for the rollers to the guides and install the rollers themselves. Top brackets with rollers should be installed a little further forward. This will ensure normal operation - the gate will not cling.
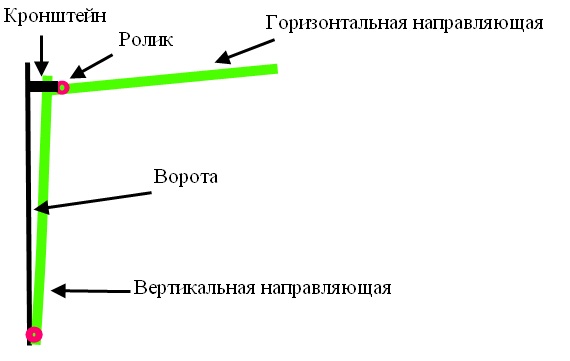
The image below gives you a closer look at what your frame should look like from the side.
Since it will be located on the street, the shield should be made the most resistant to various climatic conditions. A shield is made from any improvised materials. It can be:
Again, no one forbids you to use, say, plastic as a finishing material. In this case, the appearance of your gate will be aesthetic. Moreover, the color of plastic is offered in the widest range.
In the picture below, you can see the finished options. In the first case, a solid metal sheet is used, in the second, a shield sheathed with metal is presented.

When making a shield, there are a few little tricks that will be relevant for any owner.
Firstly, you can upholster your gates with special materials that will help keep the room warm even in cold weather. It will be quite easy to find such materials. And it will not be difficult to beat the gate with them and will not take time.
Secondly, it is worth giving one more useful advice. In order not to use the entire gate structure once again, not to open them completely, a gate can be made in the shield through which the owner can enter. The figure below shows an example of such a solution.

Many make windows in the gates. In this case, you also have two solutions. You can cut a hole in the canvas and seal it yourself with glass or plastic, or you can buy a ready-made gate window in a specialized store.
After completing all the work, the finished shield should be placed in the skids and the operability of the structure should be checked. Next, install (weld) the springs. It is they who will ensure the smooth opening / closing of the gate, in addition, will facilitate this process.
In the photo below you can see the finished structure, how it should look outside the garage and inside.

These include:
Handles should be done at the bottom of the canvas, both from the inside and from the outside. This approach will allow you to easily close and open the gate, not to cling to the edges with your fingers. And in the cold season it will be very problematic.
Heck should be installed on the inside of the canvas. So, if you made a gate, it will be possible to open the gate only from the inside. This will completely secure your garage. If the garage is attached to the house, there is an entrance to the garage from the residential part, then the purchase and installation of heck and valves can also be called the best solution.
If the garage is a separate building, then it should be closed with special locks. Or, you can buy ordinary, hinged ones, having previously made bows on the canvas and on the vertical frame (on its side facing the street, out).
In fact, this will be the final stage of self-assembly and the creation of a do-it-yourself up-and-over gate. All you have to do is paint the frame and the shield in the desired color, or, as mentioned above, upholster the shield with heat-insulating or sound-proof materials.
But, this is not all the work that can be done. There are alternative options in the mechanism, as well as modification of existing gates.
In particular, you can install a system of counterweights. To do this, you will need a winch and cables. In this case, you can achieve greater smoothness, and this also opens up great opportunities for modifications.
In the process of working on the gate, having finished the main thing, having checked the operability of the structure, it is worth taking care of safety. It is necessary to make stoppers that will not allow the canvas to leave the guides. This is a very important point that can save you from injury.
In most cases, do-it-yourself overhead gates are opened and closed by hand. It's simple and reliable. But, the modern market offers a wide range of various drives that can be installed on your gate. In this case, the gate can only be opened or closed by pressing the appropriate button.
Installing such a system will also be quite simple. The drive, together with the necessary components, is sold in any store specializing in the sale and installation of gates.
Again, you can make your gate open remotely. It's very simple. On almost all drives you can find a control panel, and in the instructions you will find the sawing of contacts. Connecting everything correctly will not be a problem - it will be difficult to give an example here, as different manufacturers use their own standards. But in any case, such information can be found in the instructions for the drive.
By installing a drive, you will get a gate that is in no way inferior to factory doors, with the possibility of remote opening, with all the advantages and features, but much cheaper. The final version of the appearance of the gate, made by hand, can be seen below.
By following this guide, you will surely be able to create your own gate easily and simply. And you can see the results of the work of other people who also set out to create a lifting gate with their own hands, you can watch the video below.
In this material, we will try to consider how you can quickly and efficiently make a garage lifting gate with your own hands. The most important advantage of this design is that when opening the garage, the gate leaf moves to the ceiling, which is much more convenient than when opening swing gates, which take up a lot of space when opened.
Well, now you have decided to make a lifting gate to the garage, and you have decided to do all the work yourself. Of all the solutions available, the most simple is the design of the gate, mounted on the pencil case-garages. But, such a solution has one significant disadvantage - there is a technological gap between the opening and the door leaf, which is simply unacceptable in our natural conditions, since the room must be insulated without fail!
It is necessary that in the closed state the canvas fits as tightly as possible. Along with this, you should also think about the gate, so that in winter, when fully open, you do not bring frosty air into the room.

To assemble the wicket frame, wooden bars will fit, for lifting garage doors it is worth using an aluminum profile. In the latter case, the finishing will be done from the outside with sheets of corrugated board or any other non-heavy material using self-tapping screws.

It is very important to design in such a way that the finished gate opened to the street, and not vice versa! Otherwise, when opening the garage door, spontaneous opening of the gate is not ruled out, which can cause injury.
The dimensions of the lifting gates should be provided a little larger than the length of the garage span, by about 10 centimeters. This is necessary to ensure that the room does not have a gap between the wall and the gate itself (about 5 centimeters).

The bottom area of the canvas should be equipped with wheels. If you do the work yourself, then ordinary roller wheels will do. The best work will be guaranteed subject to availability vertical guides- here the UD profile for installation may fit. You can buy it at a hardware store, and the thickness of the material should be approximately 0.6 millimeters.
It can be assumed that the guides from the UD profile will not be the best solution as side guides for the lifting gates in the garage, and that they will quickly bend, but practice shows that they are not heavily loaded, and therefore the material does an excellent job.
As for the doors, they are hung on the front wall of the garage with chains so that the top of the canvas comes close to the opening, and the center of gravity is just below the mounts. It also makes sense to use metal strips for fastening.


When closing, the lower edge of the garage door should fall into a special recess that will not allow the canvas to move away from the building. In this case, the lifting gate under its own weight must lean against the opening. From the inside, the canvas is equipped with special valve for a secure closure.
Facilitate maintenance in the upper position and lifting the gate leaf up will help counterweight, which should be chosen based on the mass of the installed canvas. In this case, the axles of the rollers, through the blocks, are supplemented with special cables, which are loaded with a counterweight.
Do not forget to install a holder on the opposite side below, so that it is more convenient to open the garage door from the outside, an ordinary door handle is suitable as such.
Thus, we briefly covered all the technology, now you know how to install a garage door with your own hands. At the end, we suggest watching a few more videos.


 What rules the world and all of us?")

