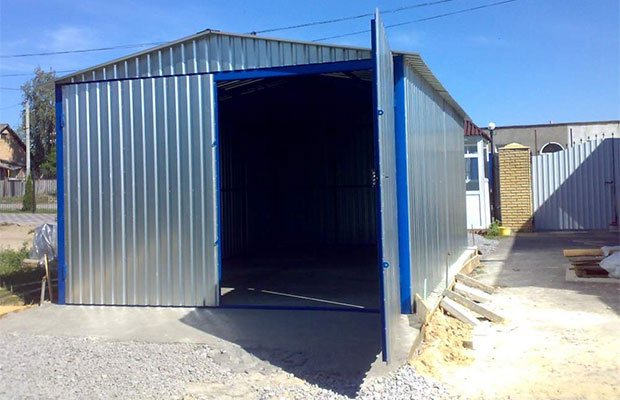
The advantages of a garage from a profiled sheet are difficult to overestimate. This building is distinguished by reliability and aesthetic appearance. However, the main factors are the affordable price of materials and the real opportunity to build a garage from a metal profile with your own hands.
When you decide to build a building from a profiled sheet, then spend a little time preparing. Building reliable protection for a car begins with sketches. Drawings of the future building will allow you to calculate the required amount of building and consumables. However, even a professionally executed scheme does not guarantee the quality of construction if building materials of inadequate quality are used.
The reliability of the garage depends on the corrugated board, also known as the metal profile. For construction, it is better to use a metal profile with the letter "C" or "HC". This marking indicates the material intended for wall cladding. The numbers that come after the letters in millimeters indicate the depth of the profile and the width of the sheet.
The reliability of the structure depends on the thickness of the sheet and the height of the profile. This is the case when saving leads to additional costs. To ensure reliable fixation of light, low-quality corrugated board, you will have to install additional racks and use self-tapping screws. But a thin sheet is not able to withstand significant mechanical stress.
However, the reliability of the garage depends not only on the sheathing material - the metal profile, but also on other structural elements: foundation, roof, frame. The latter, by the way, can be built both from metal structures and from wood. Therefore, in order to build a good garage with our own hands, we will consider each element separately.
Building a garage starts with a foundation. It depends on him how long the corrugated board building will serve its owner. The most reliable is the base of a monolithic reinforced concrete slab. It will cost inexpensively, because the weight of the garage is negligible and it does not need a powerful monolithic foundation. It is enough to pour a layer of 15-20 cm of sand and gravel and pour it with concrete.
If the level of groundwater occurrence allows (1.5–2 m), then an opening can be made in the slab for a future viewing hole. This will not greatly complicate the design of the formwork, but may be useful in the future.
Creating a concrete base is not difficult and is carried out in several stages:
There are a few tips that will help a little in the work. When filling the trench with sand or gravel, wet them to avoid cracks in the concrete. To protect the racks from corrosion, treat them with a special solution before installation. After the concrete is poured, pierce it with a rod for ventilation. By the way, M500 is considered the optimal brand of concrete. Together with the foundation, you can immediately make an inspection pit and concrete the floor of the garage.
After the foundation gains strength (depending on the weather), we proceed to the formation of the frame of the future building. There are two ways to install vertical posts: using angles and anchor bolts, or by walling them into the foundation. By choosing the second method, we will save a little and make our work easier.

Frame formation
The assembly of the frame in our case boils down to the following steps:
With the gate will have to tinker a bit. The frame for them is made of metal corners - from them you need to weld a rectangular frame of the desired size. It is reinforced with the same corners - stiffening ribs are added. Then hinges are welded to the front struts. The place for the reciprocal loops on the gate frame is simply marked - apply it to the posts and mark the places where they need to be fixed.
The final stage in the construction of the frame is the creation of the foundation for the future roof. Metal rafters will be more securely fastened by welding. After all, it accounts for significant snow and wind loads.
The main requirement for a garage roof is reliability. Therefore, for garages, as a rule, simple shed or gable roofs are erected. Both designs have proven to be effective, but a single pitch roof is less expensive to build. This is not to say that this is a particularly complex design, but some nuances are present.
Roof slope. It depends on the height of the walls, the quality (thickness) of the profiled sheet. In addition, the climatic conditions of the region are taken into account: wind and snow load. As a rule, the angle of inclination varies from 8 to 15 °. Its waterproofing also depends on the slope of the roof - at a slight angle, increased requirements are imposed on it.
The creation of a garage roof begins at the stage of frame formation. It was then that the rafters of the future roof were mounted. The main advantages of a shed roof are simplicity and reliability, and its installation can be completed in a few hours:
With the help of special programs, you can calculate the optimal distance between the racks and rafters. However, as a rule, this value ranges from 1 to 1.2 m.
Sheathing the garage with corrugated board begins only after you make sure that the frame is rigid. That is, the concrete base must dry completely, the place of fasteners should not cause concern. If used to connect bolts, re-tighten them. A reliable frame will not allow sheets of corrugated board to deform.
When calculating the material, keep in mind that the sheets must be mounted vertically - rain and snow in this case will bring the wall a minimum of harm. The corrugated board is mounted in such a way that the edges of the sheets overlap each other. By the way, when you order corrugated board, specify the desired dimensions - this will reduce labor costs.
Of the tools and consumables, we need: metal screws with a rubber seal (roofing), a screwdriver, a waterproof membrane, a plumb line, a level, a marker, pliers, metal shears, a strip bender, bending pliers,.
After the preparation, fastening of metal profile sheets to the garage frame is carried out in several stages:
Now you know how to build a garage from corrugated board with your own hands. By the way, the design can be improved. Lay along the inner perimeter and you will get a full-fledged garage that ensures the safety of the car in any climatic and weather conditions.


