Hello friends! Today I want to talk about how to properly use a drywall lifter. When a friend and I were doing ceiling repairs, I noticed how difficult it is to do without additional tools. I assembled the crate, and invited a friend to install whole sheets. And that was not easy: he stood and held the sheets while I quickly worked with a screwdriver. If you are planning not a one-time repair in your own apartment, but a permanent job with drywall, you will need a lift. With it, you can lift the sheets without damaging their integrity, and carefully fasten. Let's take a look at all the intricacies of the process together.
Builders-finishers, who constantly perform installation work on plasterboard ceiling structures, know how difficult it is to keep the GKL on weight. At the same time, the sheets need to be fixed. And what is most interesting, in the end, the sheet should lie evenly and beautifully on the ceiling surface, and the fastening should be reliable.
It is almost impossible for one person to perform such manipulations, therefore even professionals constantly take someone as their partner. If you do not have an assistant and even a worthy candidate for this position, then experts recommend purchasing a special lift drywall. Upon arrival at the specialty store, we recommend that you turn your attention to labels such as Levpano and Roger Mondelin. These are the highest quality and most reliable samples tested in practice.

The main task of the GKL lift is to lift drywall to the place of attachment. Lifts are most in demand when fixing plasterboard ceilings, since only with their help you can press the drywall sheet to the frame as evenly as possible.
Attention! Sheets of drywall on the lift can be kept indefinitely, until you finish installing the entire ceiling structure.
As for the height, there are both mechanical and electric lifts for drywall, so you can always adjust the height of the lift. If you do not have extra money for a drywall lift, then you can design it yourself.
In general, there are several types of lifts. They are classified according to the types of work performed.
Reference! GKL lifts are not only for ceilings, but also for walls.
If we talk about all types briefly, it turns out something like this:


To ensure maximum results in production, each type of lift has its own characteristics and individual operating requirements. Simply put, using the lift in your own way, you will not be able to organize the workflow as efficiently as possible, which, in the end, can lead to a breakdown of the unit.
Note! Lifts are made by two methods - at specialized enterprises and in a handicraft way (with your own hands).
If you look closely at the drawings, then the drywall spacer lift does not require any special costs. Let's look at the main fixtures and materials that we may need in our work:
Before starting work, you need to acquire a drawing in advance (see photo). Also, do not forget about the correct calculation of the load on the structure, because an incorrect calculation will lead to a breakdown of the unit.

All components of the structure are fastened to each other with bolts. The role of the lifting mechanism is performed by a mechanical device or an electric motor (this is where cables come in handy). If you are building a lift with a "manual" drive, then you need to add "legs" to the design for greater stability.
Not all of us have free time to make a lift. After all, if you are working with plasterboard ceiling structures only once every few years, then you do not need to have a bulky device. As an alternative solution, we suggest paying attention to the retainer.
It is much easier (and faster) to make it, and at the same time you will spend money at a minimum.
Here is a short guide:


Attention! If there is no 90 angle between the scarves, then the design of your latch is not suitable for work, since fixing the plasterboard at a slight angle to the ceiling is simply unacceptable.
At its core, the latch is an ordinary stand for GKL in a strictly horizontal position. If you are not going to constantly work with drywall, then this design is simply irreplaceable for you!
It turns out that the drywall lift consists of only three parts: chassis, turntable and telescopic rack. On average, if you have your own welding machine and locksmith skills, then the final price will be about 3000-4500 rubles (it all depends on the quality of the material used in the construction). As for the assembly time, all work will take about 3-5 days (it all depends on the degree of your employment).
Due to the fact that the textual presentation of the design features of the device will not be clear to everyone, we have prepared a small gift - a thematic video instruction. We wish you success in your inventions!
The complexity of working with drywall lies in the inconvenience of lifting sheets to the installation site, for example, on the ceiling.

But, in addition to the fact that the sheet must be lifted, you also need to fix it in place. And now, having imagined all this "rigble", some have no desire to work with such material. It is for such cases that a special lift for drywall (factory or home-made version), facilitating the work and providing the opportunity to carry out installation independently by one person. A drywall lift is an excellent solution for speeding up and facilitating the process of working with drywall today in private construction.
An industry like construction is booming and at the top of its popularity. Therefore, more and more various devices appear on the construction market that perform the function of an auxiliary tool.
So the drywall lift was invented precisely in order to facilitate installation when working with this material. Like other devices, drywall lifts are produced in several versions:
An example of a combined type drywall lift: on the ceiling and on the wall.
Do not forget that when using any device, safety regulations must be observed. Use of the device for purposes other than intended may result in injury to the worker.
Each drywall lift is designed for a specific type of work. And improving the device on your own will not give you the desired result, but it can lead to undesirable consequences.
As an example, we can cite the types of work that can be performed using a ceiling lifting device:
There is also such a type of device as a drywall frame lift. It is intended for lifting, installing, fixing and moving drywall sheets during horizontal installation work.
This type of lifting device for a similar material, such as a spacer structure, is used to carry out installation work in the manufacture of ceiling structures.
The device is a variant of a sliding frame, with the help of which the material rises from the floor to the required height (up to the ceiling). It is necessary to use such a building element only in accordance with the manufacturer's recommendations, that is, only for ceiling work.
Another type of lifting device is a device that carries the material. It is used for installation work on fixing sheets of this type to the wall.
The design of such a device is much simpler. It is this moment that allows using improvised materials to make such a lift with your own hands. But in no case should you experiment with such a device by lifting sheets of material to the ceiling.
As noted above, the design of the wall lifting device is simple. The factory version of the design, offered for purchase in building markets, is not cheap.
And if you only plan to use it once, then you should not buy a system. If the master regularly carries out repair work using drywall, then for him this acquisition will only bring benefits. The use of the system will quickly pay off, but the performance of work with such material will be greatly simplified.
In order to save money, you can make a lift for GKL with your own hands. All you need for manufacturing is a square section profile pipe with enough rigidity to suit the occasion. In the manufacture of a device for the installation of only wall structures, you can get by with a dry wooden beam.
The most important thing in making a do-it-yourself lifting device is an accurate calculation of the expected load, otherwise it may break.
If your lifting device is designed to work with ceiling structures, then the most logical and correct material option would be a profile pipe. Instead of a lifting mechanism, an electric motor or a mechanical device that does not require an electrical connection can be used.
The assembly scheme of such a lifting device is simple and does not require professional knowledge or special skills from you, suitable for DIY. For a more reliable fastening of the components, it is necessary to use steel bolts. They are more suitable than other fasteners for the manufacture of such a device and can easily withstand the weight of the material being lifted.
Today we will consider special fixtures for the installation and processing of drywall sheets.
When the ceiling is finished, it is very difficult for the master to cope with the work. Lifting fragile and bulky sheets to the ceiling and holding them up is not an easy task.
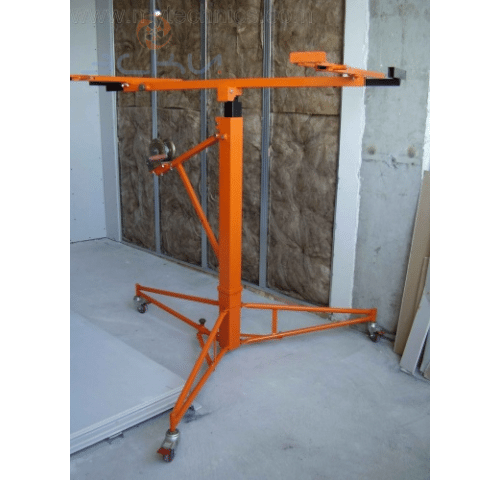
Lift spacer for drywall- a reliable station for lifting and holding plasterboard slabs, and other finishing materials, which is used when working with ceilings, laying ventilation ducts and even decorative ceilings. The drywall lifter can be made of aluminum or steel, easy to disassemble and assemble, convenient to operate and transport. A drywall lift with a height of 1.4 - 1.6 m can withstand the weight of the material up to 60 kg, and a fixture with a height of 3.5 - 4.5 m - 30-40 kg. Often, such lifts are additionally equipped with holders and clamps.
In fact, a drywall spacer lift can be called a kind of jack that is able to lift huge sheets to the ceiling. These modern devices allow you to independently, without assistants, mount ceiling structures at a height of up to 4.5 m.
The Premos lift is a modern fixture for mounting drywall to the ceiling. The device greatly facilitates the process of mounting sheets, so for many it has already become indispensable.

Premos - the lift is designed to lift sheets to the ceiling with subsequent fixation in a horizontal position during ceiling work with drywall.
Tool Benefits:
The lifting height of the Premos device is from 3.2 to 4.2 m, the load capacity reaches 100 kg with a total weight of the structure of 23 kg. The device is convenient both during transportation and during operation.
This device can be made by hand. The drywall lift consists of four mechanisms that are assembled separately, combined at the final stage into a single device.
Design drawings should include the following elements:
Devices for transferring and fixing drywall, curly cutting and faster installation are constantly evolving and modernizing, and therefore, be sure to follow the latest on the market.
Holding a sheet of drywall, exposing it along the profiles of the structure, and contriving to fix it simultaneously with all this, is not an easy task. A drywall lift will help reduce the laboriousness of the process. The device can be purchased or a homemade mechanism can be made.
The Premos drywall lift is an analogue of a jack, when using it, GKL is installed without assistants. Specifications depending on the model:
Application area:
To make a markup using a drywall lift, you need to raise its bar by installing it on the upper jumper under the ceiling. To prevent falling, the laser device is securely fixed with two clamps.
When sheathing the GKL, the retractable bar is installed at the very bottom, holding the support frame. Expose the clamps up and place the drywall plate. The support frame is then placed horizontally and the latches are lowered down to ensure a snug fit. The handle of the rack assembly adjusts the height of the drywall rise. When the sheet takes the desired position, it is pressed and fixed with a retractable bar.
With a wall height of more than 3.5 m, the gypsum board is raised until the frame extends to a distance of 1 m, after which the support frame is supported, for example, with a rule or a metal rail. In this case, one edge rests on the floor, and the other on the support frame. Then fasten with hardware and lift. Thus, it becomes possible to raise drywall to a height of more than 4 m.
Various types of devices are produced: wall, ceiling and universal. In the latest models, the GKL can be mounted vertically and horizontally to the base, as well as at an angle. The drywall lift has a long service life, is easy to maintain, and is reliable in use. It is easy to disassemble and convenient to transport.
A homemade device is made for one-time use or a reliable device is made with an electric drive and a winch for long-term service. The electric drive is controlled remotely from the remote control. Drywall is a fragile and bulky material, so the mechanism must be reliable, made of durable elements.
To make a drywall lift with your own hands, you will need drawings and calculation of the load on the fixture. You should also prepare:
The latch for carrying drywall consists of elements and assemblies:
Structural elements for carrying GCR are fastened with hardware (screws or self-tapping screws). The bars are knocked down in a T-shape with nails, then the scarves are attached (the angle between the scarves is 90 degrees). Holes are made in the pipes for the passage of the winch.
For figured cutting of drywall, a specialized cutter is used to obtain holes from 15 to 40 cm. For small holes, ring nozzles for a drill are used.
Sliding legs are made of a metal profile, and one of the three legs is welded. The other two legs are swivel, mounted to the pipe profile, which will act as a central rack. All three legs are equipped with a wheel with a stopper.
A profiled pipe 60x60 mm is grown so that a telescopic rack of a device for carrying drywall is installed on it. The resulting structure is welded to the central landing gear.
The telescopic part can be round or square and consists of three components:
Plugs are placed on one side of the small rack. Frame elements are installed one inside the other. They are pulled out with a winch, cable and rollers. For convenience, guide winches are foldable.
The main structural part of the device for carrying GKL is a table. It is made from a profile with a cross section of 30 mm. Two pieces of the profile are welded, two pieces are attached to the hardware transversely to them. To be able to adjust the length of the drywall sheet, a profile with a section of 20 mm is inserted into the axial element of the table, to which segments with a section of 30 mm are attached. The entire structure of the mechanism table is mounted by a rotary assembly to a small rack.
Faster installation and ease of carrying material are achieved by upgrading the device:
Make a lift drywall Do-it-yourself is much more profitable than buying or renting. The purchase will cost about 5 to 10 times more than the cost of the parts. If rented, then the next repair will need to be spent again on the lifting mechanism.
Self-production can take up to 5 days, but will save money and also reduce physical stress. The weight of one sheet of drywall reaches approximately 30 kilograms and requires the constant help of 1 or 2 people. With such gravity, the sheet needs to be fixed evenly and firmly, which takes a lot of time and effort. The hoist on average can withstand up to 50 kilograms of weight, securely fixes the sheet for the required time at the right angle, which is well reflected in the quality of work.
There are many types of drywall lifters, but you can also make your own, it will take about five days.
Spacer for drywall is useful in the following cases:
The mechanism operates on the principle of a jack. First, a sheet of drywall with clamps is securely fixed on the surface of the spacer table. Then, using the lifting mechanism, the sheet is delivered to the selected height and set at the desired angle, provided that the lift is universal.


